Test B: All Power Windows Inoperative (DTC B1304)
- Using New Generation Star (NGS) tester, perform Front Electronic Module (FEM) self-test. If DTC B1304 is retrieved, go to next step. If no DTCs are retrieved, go to step 4
. If any other DTCs are retrieved, perform appropriate test in accordance with DTC retrieved. See FRONT ELECTRONIC MODULE DIAGNOSTIC TROUBLE CODE INDEX
table under SELF-DIAGNOSTIC SYSTEM.
- Disconnect FEM 22-pin harness connector C191. See Figure
. Turn ignition switch to RUN position. Measure voltage between ground and FEM harness connector C191 terminal No. 6 (Light Blue wire). See Figure
. If voltage is 10 volts or more, go to next step. If voltage is less than 10 volts, replace FEM. See FRONT ELECTRONIC MODULE
under REMOVAL & INSTALLATION.
- Turn ignition switch to LOCK position. Remove accessory delay relay from central junction box. Central junction box is located behind left side of instrument panel. Turn ignition switch to RUN position. Measure voltage between ground and FEM harness connector C191 terminal No. 6 (Light Blue wire). If voltage is 10 volts or more, repair short to voltage in Light Blue wire. See WIRING DIAGRAMS
. If voltage is less than 10 volts, replace accessory delay relay.
- Remove and inspect fuse No. 106 (30-amp) from battery junction box. Battery junction box is located in left side of engine compartment. Measure voltage between ground and fuse No. 106 (input side). If voltage is 10 volts or more, go to next step. If voltage is less than 10 volts, repair open in power distribution circuit. See POWER DISTRIBUTION article in WIRING DIAGRAMS.
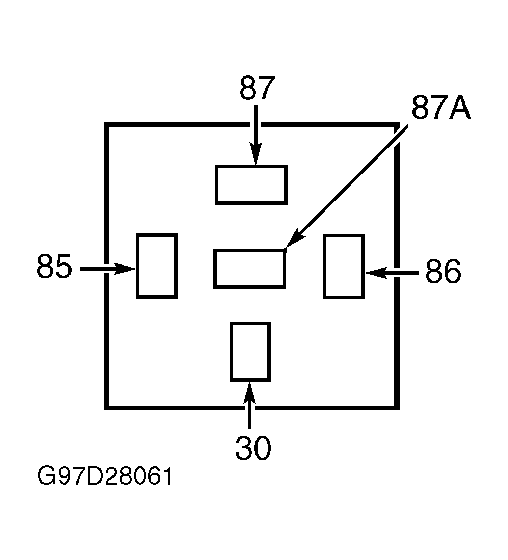
- Install fuse No. 106 to battery junction box. Remove accessory delay relay from central junction box, located behind left side of instrument panel. Measure voltage between ground and accessory delay relay sockets No. 30 and 85 in central junction box. See Fig 1
. If voltage is 10 volts or more, go to next step. If voltage is less than 10 volts, repair open in power distribution circuit. See POWER DISTRIBUTION article in WIRING DIAGRAMS.
- Test accessory delay relay. See ACCESSORY DELAY RELAY TEST
under COMPONENT TESTS. If accessory delay relay is okay, go to next step. If accessory delay relay is not okay, replace relay.
- Using NGS tester, trigger ACCY RLY ON and OFF. Measure resistance between ground and accessory delay relay harness connector terminal No. 86 (Light Blue wire). Resistance should be 5 ohms or more when on and less than 10 k/ohms when off. If resistance is as specified, go to next step. If resistance is not as specified, go to step 10
.
- Turn ignition switch to LOCK position. Disconnect FEM 22-pin harness connector C191. See Figure
. Measure resistance between ground and accessory delay relay harness connector terminal No. 86 (Light Blue wire). If resistance is 10 k/ohms or more, go to next step. If resistance is less than 10 k/ohms, repair short to ground in Light Blue wire. See WIRING DIAGRAMS
.
- Measure resistance of Light Blue wire between FEM harness connector C191 terminal No. 6 and accessory delay relay harness connector terminal No. 86. See Figure
and Fig 1
. If resistance is less than 5 ohms, replace FEM. See FRONT ELECTRONIC MODULE
under REMOVAL & INSTALLATION. If resistance is 5 ohms or more, repair open in Light Blue wire. See WIRING DIAGRAMS
.
- Remove master window regulator control switch. Test master window regulator control switch. See MASTER WINDOW REGULATOR CONTROL SWITCH
under COMPONENT TESTS. If master window regulator control switch is okay, go to next step. If master window regulator control switch is not okay, replace master window regulator control switch.
- Ensure accessory delay relay is still removed from central junction box, and master window regulator control switch harness connector is disconnected. Measure resistance between ground and master window regulator control switch harness connector C501 terminal No. 2 (Light Blue/Black wire). See Figure
. If resistance is 10 k/ohms or more, go to next step. If resistance is less than 10 k/ohms, repair short to ground in Light Blue/Black wire. See WIRING DIAGRAMS
.
- Measure resistance of Light Blue/Black wire between accessory delay relay harness connector terminal No. 87 and master window regulator control switch harness connector C501 terminal No. 2. See Figure
and Fig 1
. If resistance is less than 5 ohms, replace FEM. See FRONT ELECTRONIC MODULE
under REMOVAL & INSTALLATION. If resistance is 5 ohms or more, repair open in Light Blue/Black wire. See WIRING DIAGRAMS
.
 Courtesy of FORD MOTOR CO.