Valve Clearance
- With engine cold, disconnect negative battery cable. Remove air duct and dust covers. Remove 2 bolts, nut and throttle body cover. Remove air hose from AIC valve. Remove hose from power steering air control valve. Remove 2 bolts, disconnect air connector pipe from throttle body and remove air connector pipe.
- Remove 2 bolts and disconnect front claw groove of upper cover from claw of lower cover. Remove upper high tension wire cover. Disconnect PCV hose from PCV valve on left cylinder head. Remove 3 bolts and wire cover. Remove 4 bolts, right timing belt cover and 3 gaskets.
- Disconnect vacuum hose from EVAP BVSV. Remove 4 bolts and disconnect wire grommet from left timing belt cover. Remove timing belt cover and 3 gaskets. Disconnect spark plug wires from spark plugs. Remove spark plugs. Remove bolt and spark plug wire clamp. Remove 4 clamps.
- Disconnect throttle body sensor connectors. Disconnect water by-pass pipe (rear water by-pass joint) from clamp on engine wire cover. Disconnect water by-pass pipe from hose. Remove 2 bolts and 2 nuts, disconnect PCV hose from cylinder head cover and remove throttle body with gasket.
- Disconnect engine wire from wire bracket on right cylinder head. Remove bolt and pull out dipstick guide with dipstick. Remove both cylinder head covers.
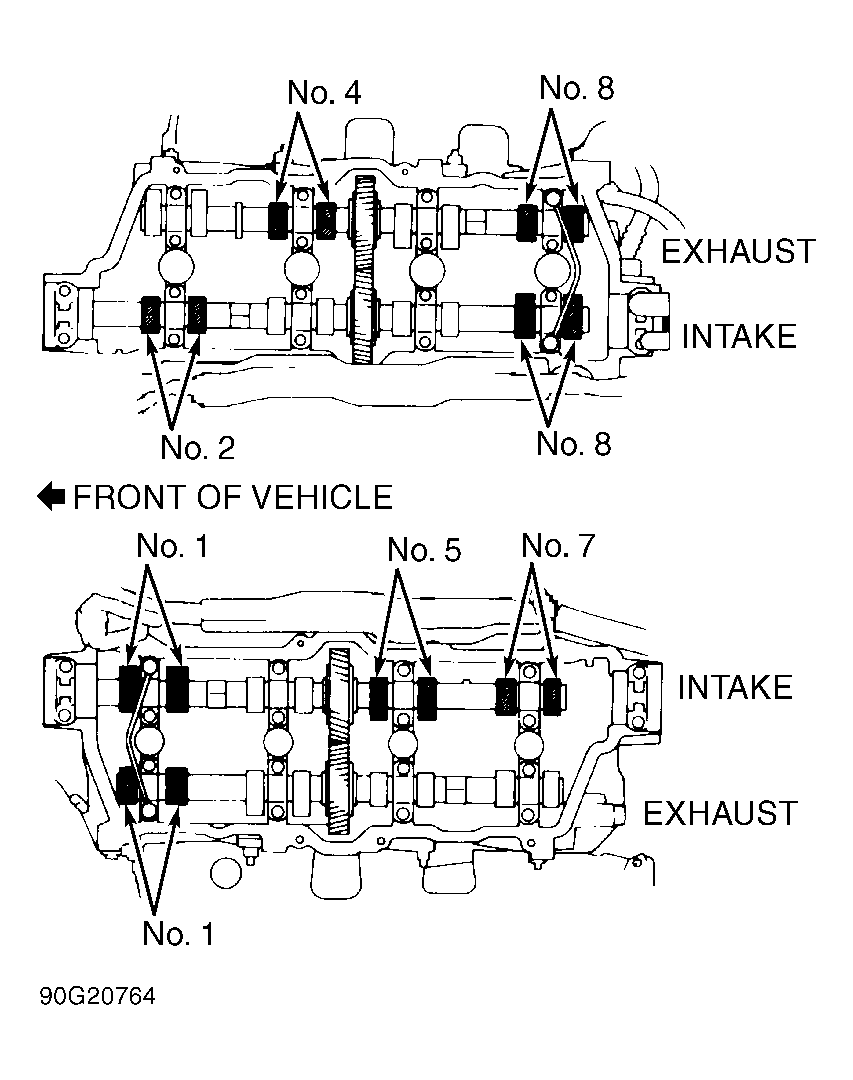
- Turn crankshaft pulley and align its groove with "0" timing mark on No. 1 timing belt cover. Ensure that timing marks of the camshaft pulleys and timing belt rear plates are aligned. If not, rotate crankshaft one revolution (360 degrees) and align marks again.
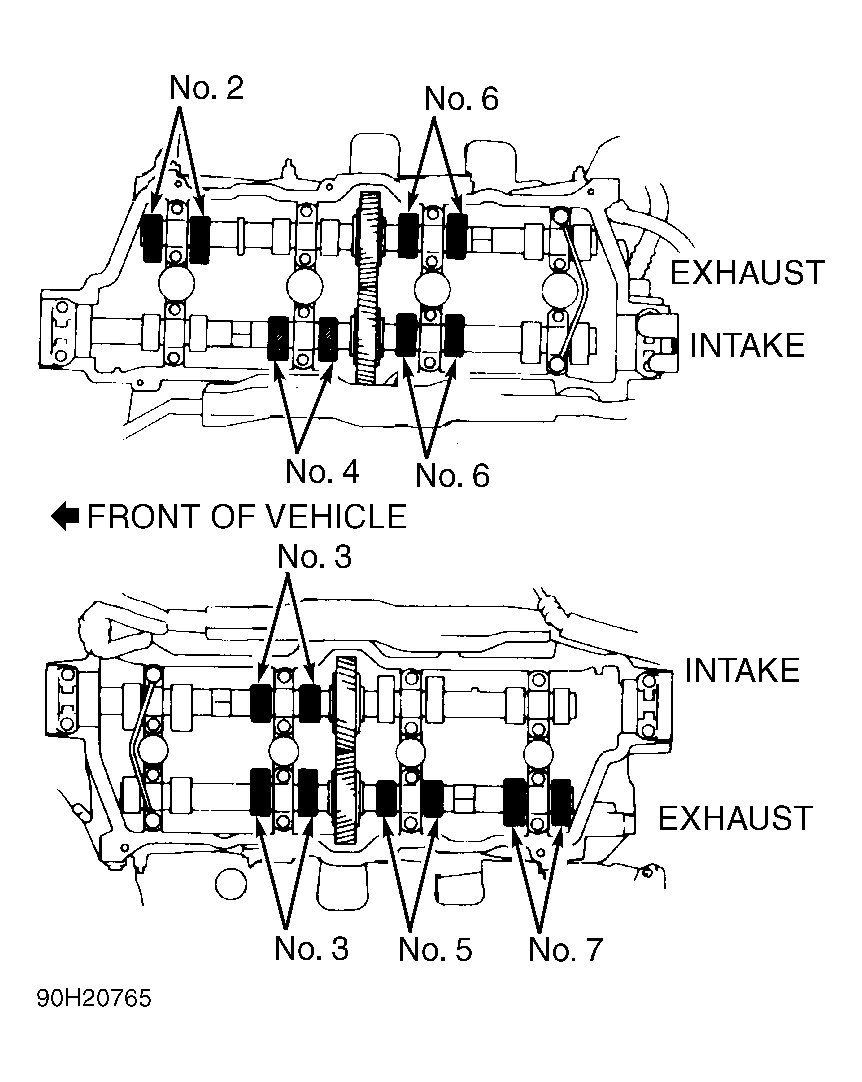
- Measure and record clearance of intake valves on cylinders No. 1, 2, 5, 7 and 8, and exhaust valves on cylinders No. 1, 4 and 8. See Fig 1 & 2. Rotate crankshaft pulley 360 degrees (1 revolution) and align timing marks. Measure and record clearance of intake valves on cylinders No. 3, 4 and 6, and exhaust valves on cylinders No. 2, 3, 5, 6, and 7. See Fig 1 & 2.
 Courtesy of © TOYOTA, LICENSE AGREEMENT TMS1002
 Courtesy of © TOYOTA, LICENSE AGREEMENT TMS1002
 Courtesy of © TOYOTA, LICENSE AGREEMENT TMS1002
- Determine if clearance is within specification. See LS400 VALVE CLEARANCE SPECIFICATIONS TABLE in this article. If clearance adjustment is required, rotate crankshaft pulley to position lobe upward on the valve to be adjusted.
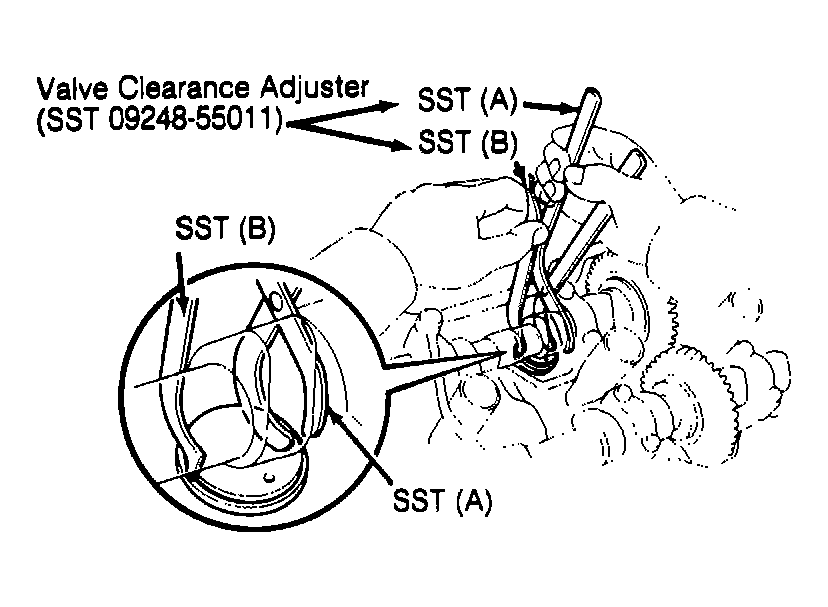
- Use Valve Clearance Adjuster (SST 09248-55011) to press valve lifter downward. Press valve lifter downward using SST (A) and install SST (B) between camshaft and valve lifter and remove SST (A). See Fig 3. Using compressed air and magnet, remove adjusting shim by blowing air into shim hole.
- Using a micrometer, measure thickness of shim just removed. Select a new shim that will give correct valve clearance. See LS400 VALVE CLEARANCE SPECIFICATIONS TABLE in this article. Shims are available in thickness of .0984-.1299" (2.50-3.30 mm) in .002" (.05 mm) increments.
- Install proper shim. Using SST (A), press downward on valve lifter and remove SST (B). Recheck valve clearance. Reinstall cylinder head covers using new gaskets. Tighten cylinder head cover bolts to 52 INCH lbs. (5.9 N.m). Install remaining components. Fill cooling system and check for leaks.
VALVE CLEARANCE SPECIFICATIONS
| Application |
In. (mm) |
| Exhaust |
.010-.014 (.25-.35) |
| Intake |
.006-.010 (.15-.25) |