Valve Clearance: Es300
- With engine cold, disconnect negative battery cable. Drain engine coolant. On automatic transmission models, disconnect throttle cable from throttle linkage. Disconnect accelerator cable from throttle linkage.
- Disconnect airflow meter connector and air hoses. Disconnect coil cord clamp. Loosen air cleaner hose clamp bolt. Release air cleaner cover clips. Remove air cleaner cap and airflow meter together with air cleaner hose.
- With a 5-mm hex-wrench, remove the center valley cover. On California cars, disconnect the EGR gas temperature sensor connector clamp from the emission control valve set. Disconnect vacuum hoses from fuel pressure VSV and IACV VSV. Disconnect VSV connectors. Remove the 2 bolts and emission control set.
- Disconnect brake booster vacuum hose. Disconnect P/S air hose. Disconnect PCV hose. Disconnect IAVC vacuum hose. Remove nut and disconnect the 2 ground straps. Disconnect cold start injector connector. Disconnect cold start injector pipe (No. 2 fuel pipe). Ensure spilled fuel from union is caught with a shop towel.
- Remove 2 bolts and engine hanger. Remove 2 bolts and disconnect air intake chamber stay. Disconnect and remove EGR pipe. Remove bolt and disconnect hydraulic pressure pipe from air intake chamber. Disconnect 3 emission control vacuum hoses. Disconnect 2 water by-pass hoses. On California vehicles, disconnect EGR gas temperature sensor connector. Disconnect TPS connector. Disconnect ISC valve connector. Disconnect ISC valve air hose. Disconnect P/S air hose. Remove air intake chamber bolts (2) and nuts (2), and remove air intake chamber and gasket.
- To disconnect LH engine wire harness: disconnect 3 injector connectors, engine oil level sensor connector, oil pressure switch connector and A/C compressor connector. Disconnect alternator connector and wire. Disconnect water temperature sensor connector (for hydraulic cooling fan). Remove the 2 bolts, and disconnect the 5 clamps and LH engine wire harness.
- To disconnect RH engine wire harness: disconnect 3 injector connectors, water temperature sender gauge connector, O2 sensor connector and P/S pump connector. Remove the 2 bolts and disconnect the 2 clamps and RH engine wire harness. Remove the cylinder head cover nuts and seal washers, and remove the cylinder head covers.
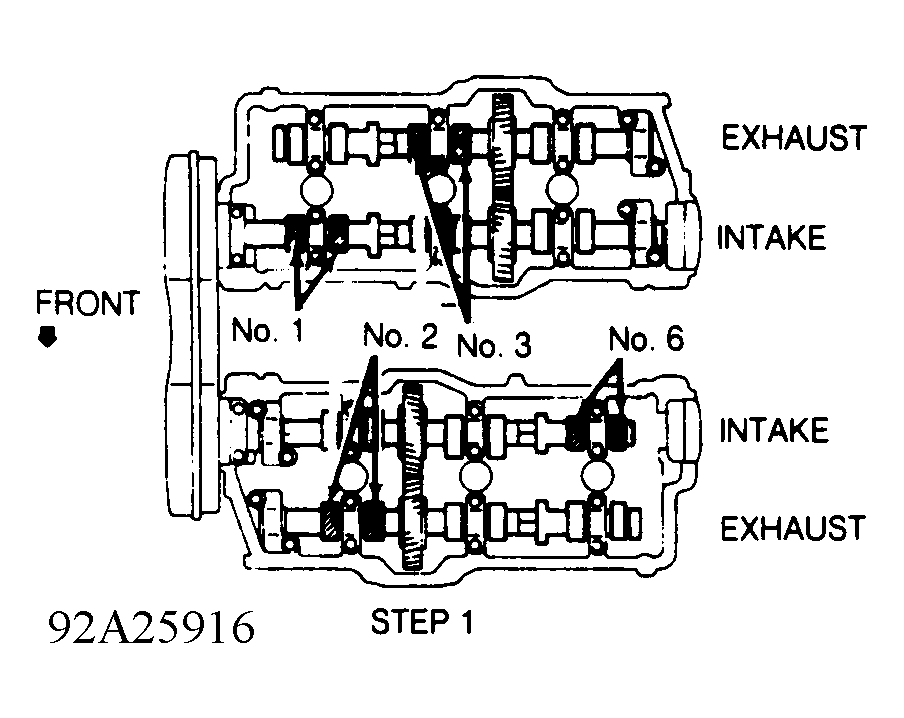
- Rotate crankshaft pulley and align pulley groove with "0" mark on timing belt cover to position No. 1 cylinder at TDC of compression stroke. Ensure cylinder No. 1 intake valve lifters are loose and exhaust valve lifters are tight. If not, rotate crankshaft 360 degrees and realign timing marks. See Fig 1.
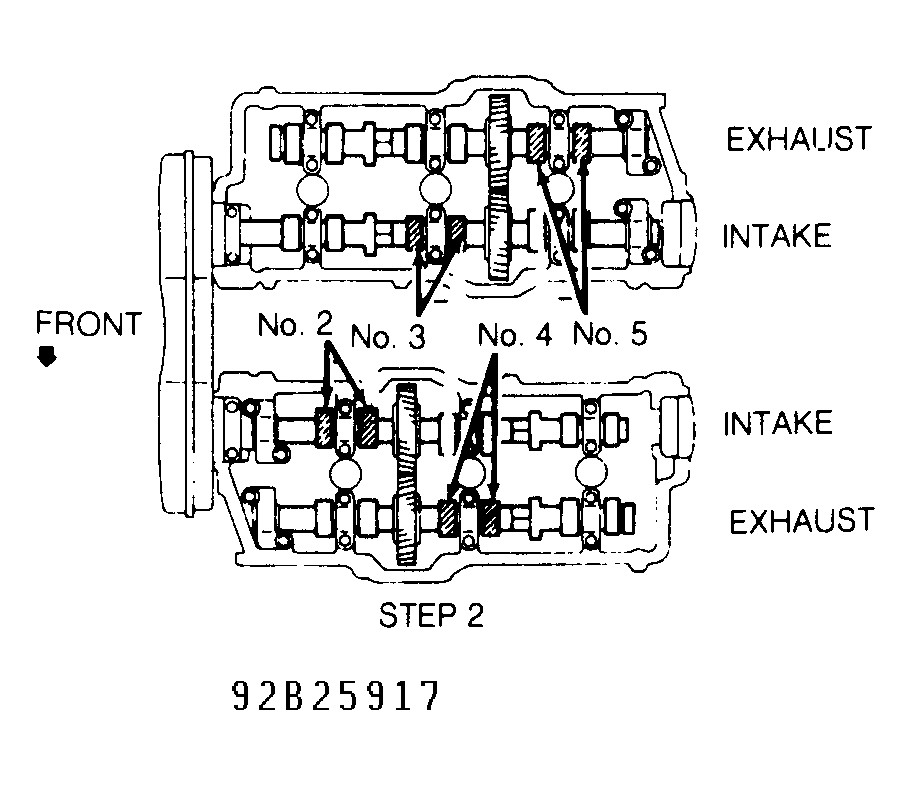
- Measure and record clearance of intake valves on cylinders No. 1 and 6, and exhaust valves on cylinders No. 2 and 3. Rotate crankshaft pulley 240 degrees (2/3 of a revolution). Measure and record clearance of intake valves on cylinders No. 2 and 3, and exhaust valves on cylinders No. 4 and 5. See Fig 2.
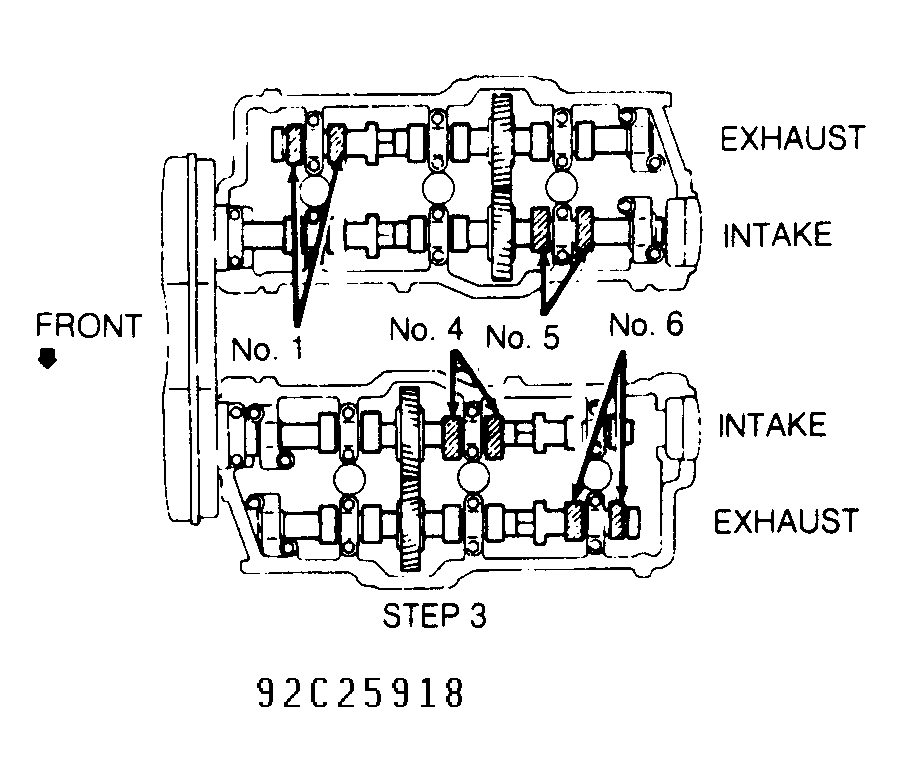
- Rotate crankshaft pulley another 240 degrees (2/3 of a revolution). Measure and record clearance of intake valves on cylinders No. 4 and 5, and exhaust valves on cylinders No. 1 and 6. See Fig 3.
 Courtesy of © TOYOTA, LICENSE AGREEMENT TMS1002
 Courtesy of © TOYOTA, LICENSE AGREEMENT TMS1002
 Courtesy of © TOYOTA, LICENSE AGREEMENT TMS1002
- Determine if clearance is within specification. See VALVE CLEARANCE SPECIFICATIONS TABLE (ES300) . If clearance adjustment is required, rotate crankshaft pulley to position lobe upward on valve to be adjusted.
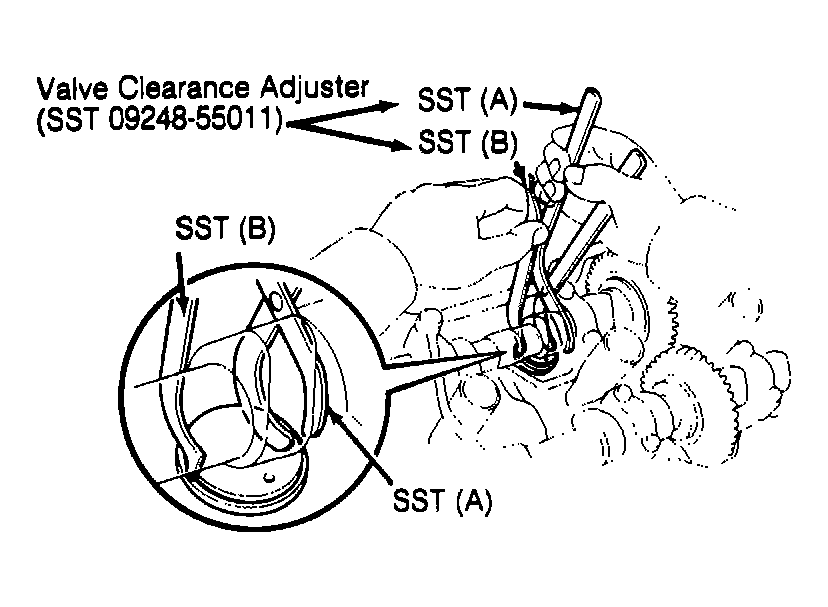
- Use Valve Clearance Adjuster (SST 09248-55011) to press valve lifter downward. Prior to pressing lifter downward, position adjustment shim notch area toward spark plug.
- Press valve lifter downward using SST (A), install SST (B) between camshaft and valve lifter and remove SST (A). See Fig 4. Using a small screwdriver and magnet, remove adjusting shim.
 Courtesy of © TOYOTA, LICENSE AGREEMENT TMS1002
- Using a micrometer, measure thickness of shim just removed. Select a new shim that will give correct valve clearance. See VALVE CLEARANCE SPECIFICATIONS TABLE (ES300) . Shims are available in thicknesses of .0984-.1299" (2.50-3.30 mm) in .002" (.05 mm) increments.
- Install proper shim. Using SST (A), press downward on valve lifter and remove SST (B). Recheck valve clearance. For installation, reverse removal procedure. Install air intake chamber using new gaskets. Tighten air intake chamber bolts to 32 ft. lbs. (43 N.m) and EGR pipe to 58 ft. lbs. (78 N.m). Install remaining components.
- Air must be bled from cooling system while filling. To bleed air from cooling system, open union bolt (bolt closest to upper radiator hose on radiator hose outlet on intake manifold) approximately 5 revolutions. Fill cooling system, and tighten union bolt to 13 ft. lbs. (18 N.m).
VALVE CLEARANCE SPECIFICATIONS
| Application |
In. (mm) |
| Exhaust |
.011-.015 (.27-.37) |
| Intake |
.005-.009 (.13-.23) |