Removal [09/2012 - ]
- REMOVE V-BANK COVER SUB-ASSEMBLY
- Using both hands, lift the rear side of the cover upwards to detach the 4 clips labeled B. Then slide the cover toward the front of the vehicle to detach the 2 clips labeled A and remove the V-bank cover sub-assembly.
 Courtesy of © TOYOTA, LICENSE AGREEMENT TMS1002
NOTE:
- The V-bank cover sub-assembly may be damaged if its front and rear are lifted at the same time.
- When detaching the clips labeled A, be sure to slide the cover toward the front of the vehicle.
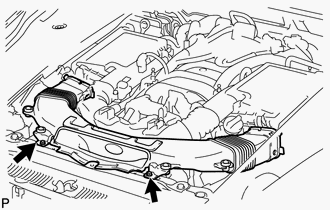
- REMOVE AIR CLEANER INLET COVER SUB-ASSEMBLY
- Remove the 5 clips labeled A.
 Courtesy of © TOYOTA, LICENSE AGREEMENT TMS1002
- Lift up the air cleaner inlet cover sub-assembly to detach the 4 clips labeled B, and remove the air cleaner inlet cover sub-assembly.
- REMOVE NO. 1 AIR CLEANER INLET
- Remove the 2 bolts.
 Courtesy of © TOYOTA, LICENSE AGREEMENT TMS1002
- Hold the No. 1 air cleaner inlet by the protrusions labeled A and labeled B, and detach the connections.
 Courtesy of © TOYOTA, LICENSE AGREEMENT TMS1002
- Rotate the No. 1 air cleaner inlet as shown in the illustration to detach the protrusion labeled C.
- Hold the No. 1 air cleaner inlet by the protrusions labeled D and labeled E, and detach the connections.
- Rotate the No. 1 air cleaner inlet as shown in the illustration to detach the protrusion labeled F.
- REMOVE FRONT WHEEL OPENING EXTENSION PAD LH (for AWD)
. Refer to REMOVAL [09/2012 - ] - Step 7
- REMOVE FRONT WHEEL OPENING EXTENSION PAD RH (for AWD)
. Refer to REMOVAL [09/2012 - ] - Step 8
- REMOVE NO. 1 ENGINE UNDER COVER
. Refer to REPLACEMENT [09/2012 - ] - Step 6
- DRAIN ENGINE COOLANT
. Refer to REPLACEMENT [09/2012 - ] - Step 7
- REMOVE INTAKE AIR CONNECTOR PIPE
. Refer to REMOVAL [09/2012 - ] - Step 9
- REMOVE THROTTLE BODY ASSEMBLY
- Disconnect the throttle motor connector.
 Courtesy of © TOYOTA, LICENSE AGREEMENT TMS1002
- Remove the 4 bolts and throttle body assembly.
- Disconnect the No. 4 and No. 5 water by-pass hoses from the throttle body assembly.
 Courtesy of © TOYOTA, LICENSE AGREEMENT TMS1002
- Remove the gasket from the intake manifold.