DTC P1259: Variable Valve Timing & Lift Electronic Control System Malfunction
- Check engine oil level, refill if necessary. Perform PCM reset procedure. See PCM RESET PROCEDURE/CLEARING DIAGNOSTIC TROUBLE CODES
. Start engine and run at 3000 RPM, with no load (in park or neutral) until radiator fan comes on. Road test vehicle in position "1" at more than 4000 RPM (position "2" at more than 4500 RPM, on MDX) and hold for more than 2 seconds. If DTC P1259 comes on, go to next step. If DTC P1259 does not come on during first road test, repeat procedure 2 more times. If DTC P1259 is not repeated, problem is intermittent. System is okay at this time. Check for poor connection(s) or loose wire(s) between PCM 25-pin harness connector and Variable Valve Timing & Lift Electronic Control (VTEC) solenoid valve single pin harness connector.
- Turn ignition switch off. Disconnect VTEC oil pressure switch 2-pin harness connector. Check for continuity between VTEC oil pressure switch 2-pin connector terminals No. 1 and 2. See WIRING DIAGRAMS
article. If continuity is present, go to next step. If continuity is not present, replace VTEC oil pressure switch.
- Turn ignition switch on. Measure voltage between ground and VTEC oil pressure switch 2-pin harness connector terminal No. 1 (Blue/Black wire). If battery voltage is present, go to next step. If battery voltage is not present, go to step 5
.
- Measure voltage between VTEC oil pressure switch 2-pin harness connector terminals No. 1 (Blue/Black wire) and 2 (Brown/Yellow wire). See WIRING DIAGRAMS
article. If battery voltage is present, go to step 7
. If battery voltage is not present, repair open in Brown/Yellow wire VTEC oil pressure switch 2-pin harness connector terminal No. 2 and ground terminal G101.
- Measure voltage between ground and PCM 31-pin harness connector terminal No. 10 (Blue/Black wire). See Figure
. If battery voltage is not present, go to next step. If about battery voltage is present, repair open in Blue/Black wire between PCM 31-pin harness connector terminal No. 10 and VTEC oil pressure switch 2-pin harness connector terminal No. 1.
- Turn ignition switch off. Disconnect PCM 31-pin harness connector. Check for continuity between ground and PCM 31-pin harness connector terminal No. 10 (Blue/Black wire). If continuity is present, repair short in Blue/Black wire between PCM 31-pin harness connector terminal No. 10 and VTEC oil pressure switch 2-pin harness connector terminal No. 1. See WIRING DIAGRAMS
article. If continuity is not present, substitute known-good PCM, then recheck. If symptom or indication goes away, replace original PCM.
- Turn ignition switch off. Disconnect VTEC solenoid valve single pin connector. Measure resistance between ground and VTEC solenoid valve single pin connector. If 14-30 ohms is present, go to next step. If 14-30 ohms is not present, replace VTEC solenoid valve. See RELAYS & SOLENOIDS in SYSTEM & COMPONENT TESTING article.
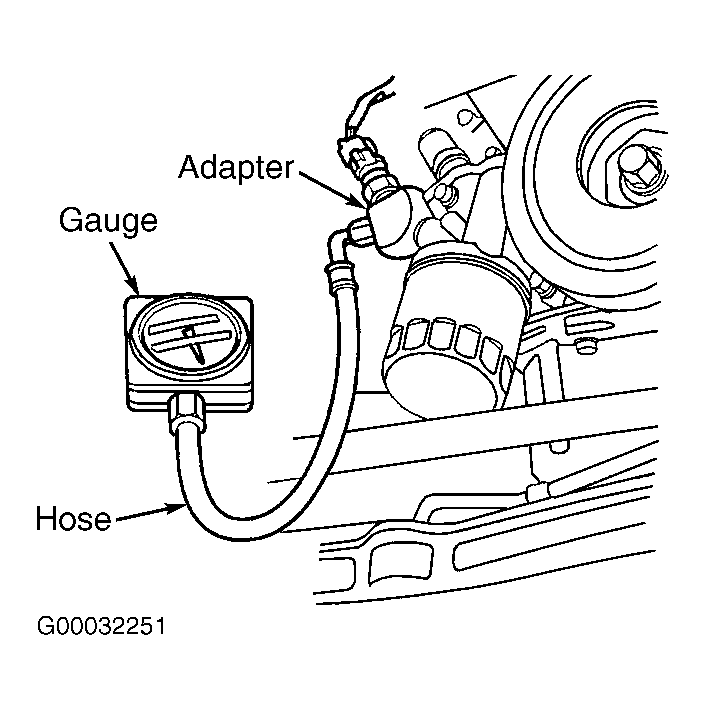
- Remove VTEC oil pressure switch. Install Adapter (07NAJ-P07010A), Hose (07MAJ-PY40120) and Gauge (07406-0070300). See Fig 1
. Reinstall VTEC oil pressure switch. Reconnect VTEC solenoid valve single pin harness connector and VTEC oil pressure switch 2-pin harness connector. Start engine and run at 3000 RPM with no load (in park or neutral) until radiator fan comes on. Connect remote tachometer under hood. Check oil pressure at 1000, 2000 and 3000 RPM. Checks should be done in under one minute because of engine running with no load. If oil pressure is less than 49 kPa, go to next step. If oil pressure is not as specified, test VTEC solenoid valve. See RELAYS & SOLENOIDS
in SYSTEM & COMPONENT TESTING article.
 Courtesy of AMERICAN HONDA MOTOR CO., INC.
- Turn ignition switch off. Disconnect VTEC solenoid valve single pin harness connector. Using fused jumper wire, connect battery voltage to VTEC solenoid valve single pin harness connector terminal. Start engine and check oil pressure at 3000 RPM. If pressure is more than 390 kPa, go to next step. If oil pressure is not as specified, test VTEC solenoid valve. See RELAYS & SOLENOIDS
in SYSTEM & COMPONENT TESTING article.
- With battery voltage still connected to VTEC solenoid valve single pin harness connector (backprobing), measure voltage between ground and PCM 31-pin harness connector terminal No. 10 (Blue/Black wire). See WIRING DIAGRAMS
article. If battery voltage is present at more than 4000 RPM (more than 4500 RPM on MDX), go to next step. If battery voltage is not as specified, replace VTEC oil pressure switch.
- Turn ignition switch off. Disconnect fused jumper wire from VTEC solenoid valve. Check for continuity between PCM 25-pin harness connector terminal No. 12 and VTEC solenoid valve single pin harness connector (Green/Yellow wire or Light Green/Yellow wire on MDX). See Figure
. If continuity is present, go to next step. If continuity is not present, repair open in Green/Yellow wire (Light Green/Yellow wire on MDX), between PCM 25-pin harness connector terminal No. 12 and VTEC solenoid valve single pin harness connector.
- Check for continuity between ground and VTEC solenoid valve single pin harness connector (Green/Yellow wire or Light Green/Yellow wire on MDX). If continuity is present, repair short in Green/Yellow wire (Light Green/Yellow wire on MDX), between PCM 25-pin harness connector terminal No. 12 and VTEC solenoid valve single pin harness connector. If continuity is not present, substitute known-good PCM, then recheck. If symptom or indication goes away, replace original PCM.