September 30: LEMON manuals is back up on a temporary server! Slowness is possible
Warm Up TWC Removal/Installation
- Remove the charge air cooler cover (see step 1 under CHARGE AIR COOLER REMOVAL AND INSTALLATION
).
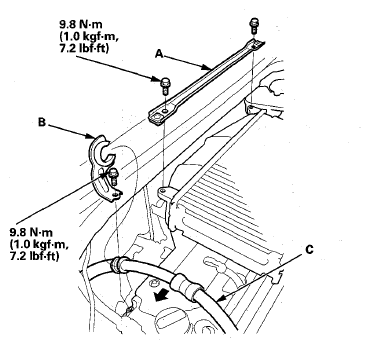
- Remove the charge air cooler cover bracket (A).
 Courtesy of AMERICAN HONDA MOTOR CO., INC.
- Remove the power steering feed hose bracket (B), then move the hose (C) in the direction of the arrow.
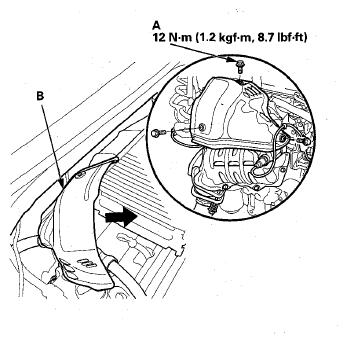
- Remove the bolts (A), then remove the turbocharger cover (B).
 Courtesy of AMERICAN HONDA MOTOR CO., INC.
- Remove the A/F sensor (see
A/F SENSOR REPLACEMENT
).
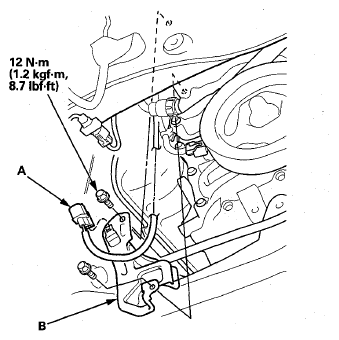
- Remove the connector (A) from the water hose lower cover (B), then remove the cover.
 Courtesy of AMERICAN HONDA MOTOR CO., INC.
- Remove the under-floor TWC (see UNDER-FLOOR TWC REMOVAL/INSTALLATION
).
- Remove the secondary HO2S (see
A/F SENSOR REPLACEMENT
).
- With SH-AWD: Remove the transfer assembly (see
TRANSFER ASSEMBLY REMOVAL
).
- Remove the P/S heat shield (see step 25 under STEERING GEARBOX REMOVAL
).
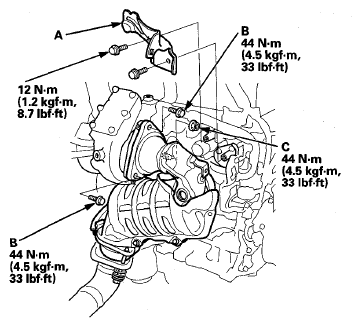
- Remove the water hose upper cover (A).
 Courtesy of AMERICAN HONDA MOTOR CO., INC.
NOTE:
This view is from the rear of the engine compartment.
- Remove the mounting bolts (B) and nut (C) from the WU-TWC.
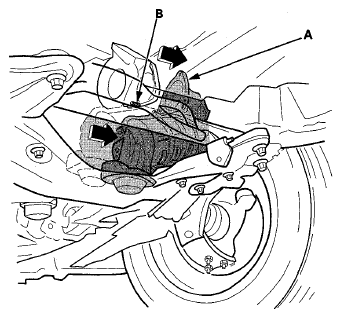
- Under the vehicle: Slide the WU-TWC toward the passenger's side to free the WU-TWC (A) from the stud (B) on the turbocharger.
 Courtesy of AMERICAN HONDA MOTOR CO., INC.
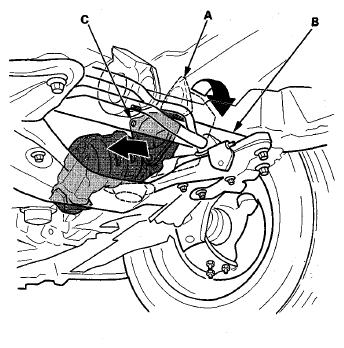
- Rotate the turbocharger side of the WU-TWC (A) down to the steering gearbox housing (B), and slide the WU-TWC toward the driver's side along gearbox housing until the WU-TWC clears the turbocharger (C).
 Courtesy of AMERICAN HONDA MOTOR CO., INC.
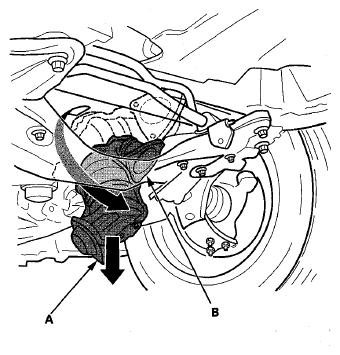
- Lower and rotate the under-floor TWC side of the WU-TWC (A) toward the passenger's side, then remove the WU-TWC (B) from the subframe.
 Courtesy of AMERICAN HONDA MOTOR CO., INC.
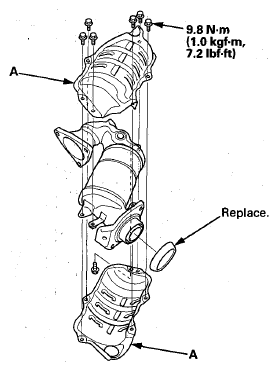
- Remove the converter cover (A).
 Courtesy of AMERICAN HONDA MOTOR CO., INC.
- Install the parts in the reverse order of removal with new gaskets (turbocharger side and under-floor TWC side). Also, replace the bolts and the nut that attach the WU-TWC to the turbocharger.
- With SH-AWD; Refill the ATF (see
TRANSFER ASSEMBLY FLUID REPLACEMENT
).