Steering Column Removal and Installation: Installation
- Install the steering column in the reverse order of removal, and note these items:
- Make sure the wires are not caught or pinched by any parts.
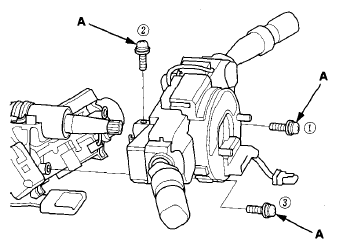
- Tighten the three screws (A) in the sequence shown below.
 Courtesy of AMERICAN HONDA MOTOR CO., INC.
- Center the steering rack within its stroke.
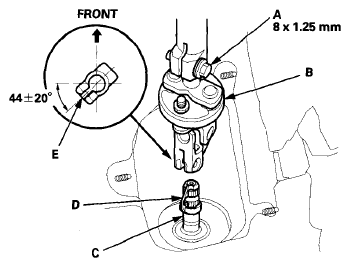
- Loosen the upper steering joint bolt (A) and slip the lower end of the steering joint (B) onto the pinion shaft (C).
NOTE:
- Pinion shaft with center guide: Install the steering joint by aligning the center guide (D).
- Pinion shaft without center guide: Position the steering column by aligning the gap (E) with the angle.
 Courtesy of AMERICAN HONDA MOTOR CO., INC.
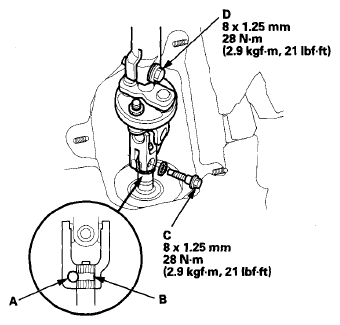
- Align the bolt hole (A) on the steering joint with the groove (B) around the pinion shaft, then loosely install the lower steering joint bolt (C). Be sure that the joint bolt is securely in the groove in the pinion shaft.
 Courtesy of AMERICAN HONDA MOTOR CO., INC.
- Pull on the steering joint to make sure that the steering joint is fully seated, then tighten the lower joint bolt to the specified torque.
- Tighten the upper steering joint bolt (D) to the specified torque.
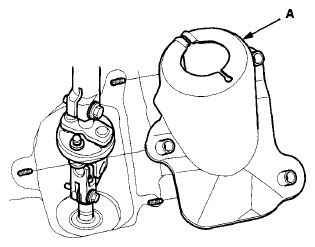
- Install the steering joint cover (A).
 Courtesy of AMERICAN HONDA MOTOR CO., INC.
- Install the column covers (see
SIDE DEFOGGER VENT TRIM REMOVAL/INSTALLATION
).
- Install the driver's dashboard undercover (see
DRIVER'S DASHBOARD UNDERCOVER REMOVAL/INSTALLATION
).
- Install the steering wheel (see STEERING WHEEL INSTALLATION
), and the driver's airbag (see
DRIVER'S AIRBAG REPLACEMENT
).
- Do the battery terminal reconnection procedure (see
BATTERY TERMINAL DISCONNECTION AND RECONNECTION
), and check these items:
- Turn the ignition switch to ON (II), or press the engine start/stop button to select the ON mode, and check that the SRS indicator comes on for about 6 seconds, and then goes off.
- Make sure the horn and turn signal switches work properly.
- Make sure the steering wheel switches work properly.
- After installation, check these items:
- Check the steering wheel spoke angle. If the steering spoke angles to the right and left are not equal (steering wheel and rack are not centered), correct the engagement of the joint/pinion shaft splines.
- With SH-AWD: Do the VSA sensor neutral position memorization (see
YAW RATE-ACCELERATION SENSOR REPLACEMENT
).
- Set the steering column to the center tilt position, and to the center telescopic position, then do the front toe inspection (see
WHEEL ALIGNMENT
).