Radio Volume Compensator Interior Noise Microphone Replacement (Headliner)
WARNING: This page does not describe the selected car, but rather 8 other vehicles, including the 2012 GMC Yukon XL, 2012 GMC Yukon, 2012 Chevrolet Tahoe, 2012 Chevrolet Suburban, and 2012 Chevrolet Avalanche. However, it is still accessible from the selected car via links, so may be relevant.
 Courtesy of GENERAL MOTORS COMPANY
 Radio Volume Compensator Interior Noise Microphone Replacement (Headliner)
| Callout |
Component Name |
Preliminary Procedure
Lower the front or rear of the headlining trim panel enough to gain access to the microphone. Refer to Headlining Trim Panel Replacement (LWB w/U42 w/o CF5)
, Headlining Trim Panel Replacement (LWB w/CJ2)
, Headlining Trim Panel Replacement (SWB w/o CF5 and U42)
, Headlining Trim Panel Replacement (LWB w/CJ3)
, Headlining Trim Panel Replacement (Avalanche/Escalade EXT w/CF5 w/o U42)
, Headlining Trim Panel Replacement (SWB w/CF5 w/o U42)
, Headlining Trim Panel Replacement (Avalanche/Escalade EXT w/U24 w/o CF5)
, Headlining Trim Panel Replacement (LWB w/CF5 and U42)
, Headlining Trim Panel Replacement (Avalanche/Escalade EXT w/CF5 and U42)
, Headlining Trim Panel Replacement (Avalanche/Escalade EXT w/CJ3)
, Headlining Trim Panel Replacement (SWB w/CF5 and U42)
, Headlining Trim Panel Replacement (SWB w/U42 w/o CF5)
, Headlining Trim Panel Replacement (LWB w/CF5 w/o U42)
, Headlining Trim Panel Replacement (SWB w/CJ3)
, Headlining Trim Panel Replacement (Avalanche w/CJ2 w/o CF5 and U42) |
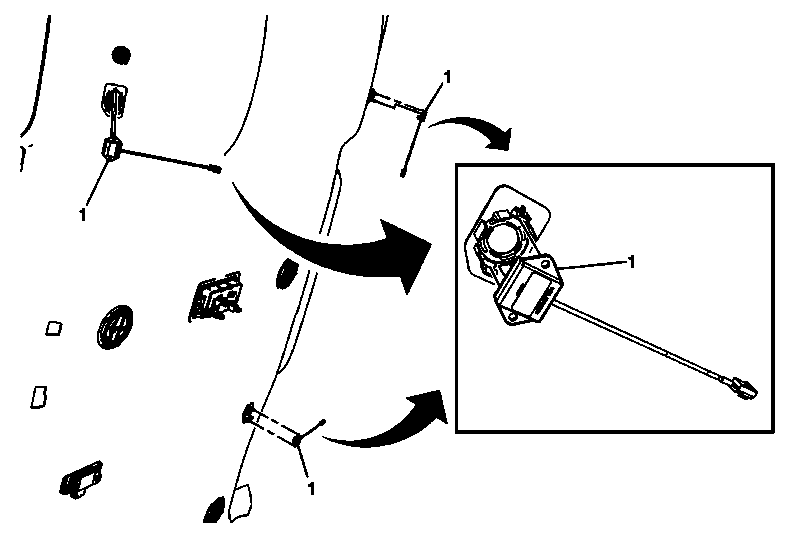
| 1 |
Radio Volume Noise Compensator Interior Noise Microphone (Qty: 3)
- Disconnect the electrical connector.
- Note the foam position around the front of the microphone and the center foam plug over the top of the microphone to ensure proper installation.
- Remove the foam plug from the top of the microphone and large foam patch from around the microphone.
- Unsnap the microphone from the grille assembly bracket.
|