Radio Antenna Base Replacement
WARNING: This page does not describe the selected car, but rather 8 other vehicles, including the 2011 GMC Yukon XL, 2011 GMC Yukon, 2011 Chevrolet Tahoe, 2011 Chevrolet Suburban, and 2011 Chevrolet Avalanche. However, it is still accessible from the selected car via links, so may be relevant.
 Courtesy of GENERAL MOTORS CORP.
 Radio Antenna Base Replacement
| Callout |
Component Name |
|
Preliminary Procedures
- Remove the battery. Refer to Battery Replacement
.
- Remove the instrument panel (I/P) upper trim pad. Refer to Instrument Panel Upper Trim Panel with Windshield Defroster Nozzle Grille Replacement (Cadillac)
, Instrument Panel Upper Trim Panel with Windshield Defroster Nozzle Grille Replacement (Except Cadillac)
.
- Disconnect the upper intermediate steering shaft. Refer to Upper Intermediate Steering Shaft Replacement
.
- Remove the 4 I/P bolts to body bolts.
- Disconnect the 5 electrical connections on the passenger side.
- Pull the passenger side of the I/P back approximately 760 mm (2.5 ft) pivoting on the drivers side. Set on floor or seat.
- Remove the 2 screws from the HVAC recirculation door and push door towards the center of the vehicle. Refer to Air Inlet Assembly Replacement
.
- Disconnect the coaxial cable at the junction.
- Insert a shim between the HVAC and side metal approximately 38 mm (1.5 in).
- Tape pull wire to the coaxial cable.
|
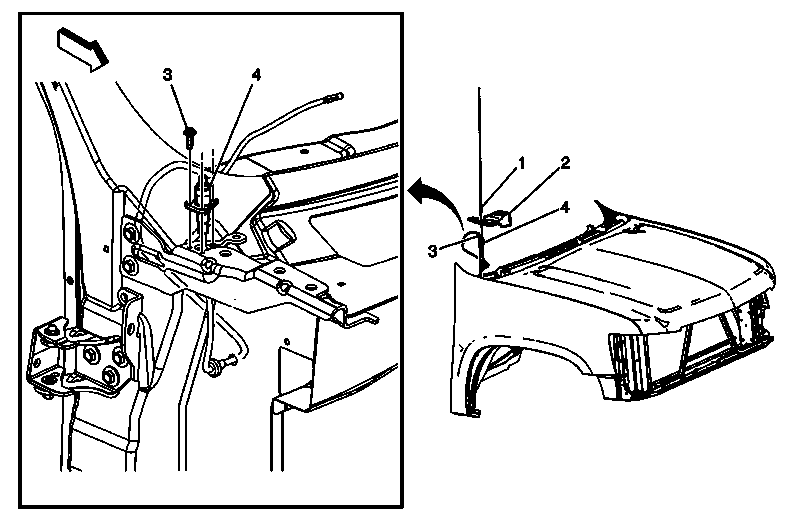
| 1 |
Radio Antenna Mast
Tighten
6 N.m (53 lb in) |
| 2 |
Air Inlet Grille Outer Cover |
| 3 |
Radio Antenna Assembly Screw (Qty: 3)
Tighten
5 N.m (44 lb in) |
| 4 |
Radio Antenna Assembly
- Remove the cable grommet from the body using the screwdriver from top down.
- Tie a long wire to the antenna cable to aid in installation of new antenna. Use a screwdriver to guide the cable from the inside.
- Tape a long pull wire to the antenna cable to aid in installation of the new antenna. Use the screwdriver to guide the wire from the inside.
- Lubricate the grommet to aid in installation.
|