Test B: Warning Indicator On With Engine Running, System Not Charging
- Check For Fault Codes In PCM
Connect New Generation Star (NGS) tester to Data Link Connector (DLC). Turn ignition on. Using NGS tester, perform Powertrain Control Module (PCM) self-test. If DTC P0622 was retrieved, follow the NO direction. Are any PCM DTCs recorded? If no, go to next step. If yes, perform appropriate test in accordance with DTC retrieved. See appropriate SELF-DIAGNOSTICS article in ENGINE PERFORMANCE.
- Check Generator B+ Circuit (Yellow/White Wire) For Voltage
Turn ignition off. Measure the voltage between the generator B+ terminal (Yellow/White wire) and ground. Is the voltage approximately equal to battery positive voltage? If yes, go to next step. If no, repair the circuit. Test the system for normal operation.
- Check Generator Integrity
Disconnect generator 3-pin connector. Start engine. If the generator communication lines are disconnected (DTC P0622 may set), the generator will self-excite if the engine is operated at greater than 2000 engine RPM for a momentary period of time. It will then operate in a default mode of approximately 13.5 volts until the engine is turned off. With the engine running at approximately 2000 RPM, measure the battery voltage. Is the battery voltage approximately 13.5 volts? If yes, go to next step. If no, install a new generator. See GENERATOR
under REMOVAL & INSTALLATION. Test the system for normal operation.
- Check GEN COM Circuit (Light Blue/Red Wire) For An Open Or Short To Ground
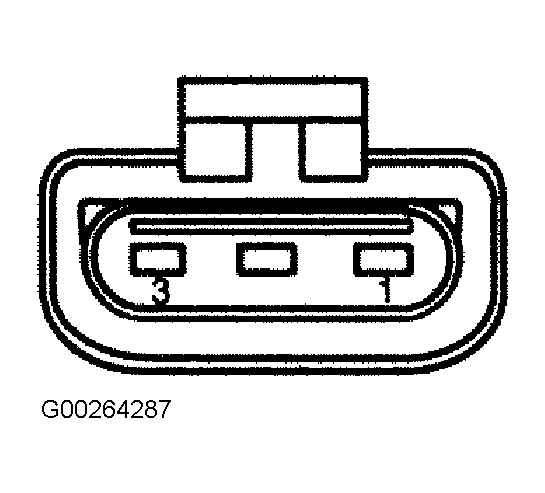
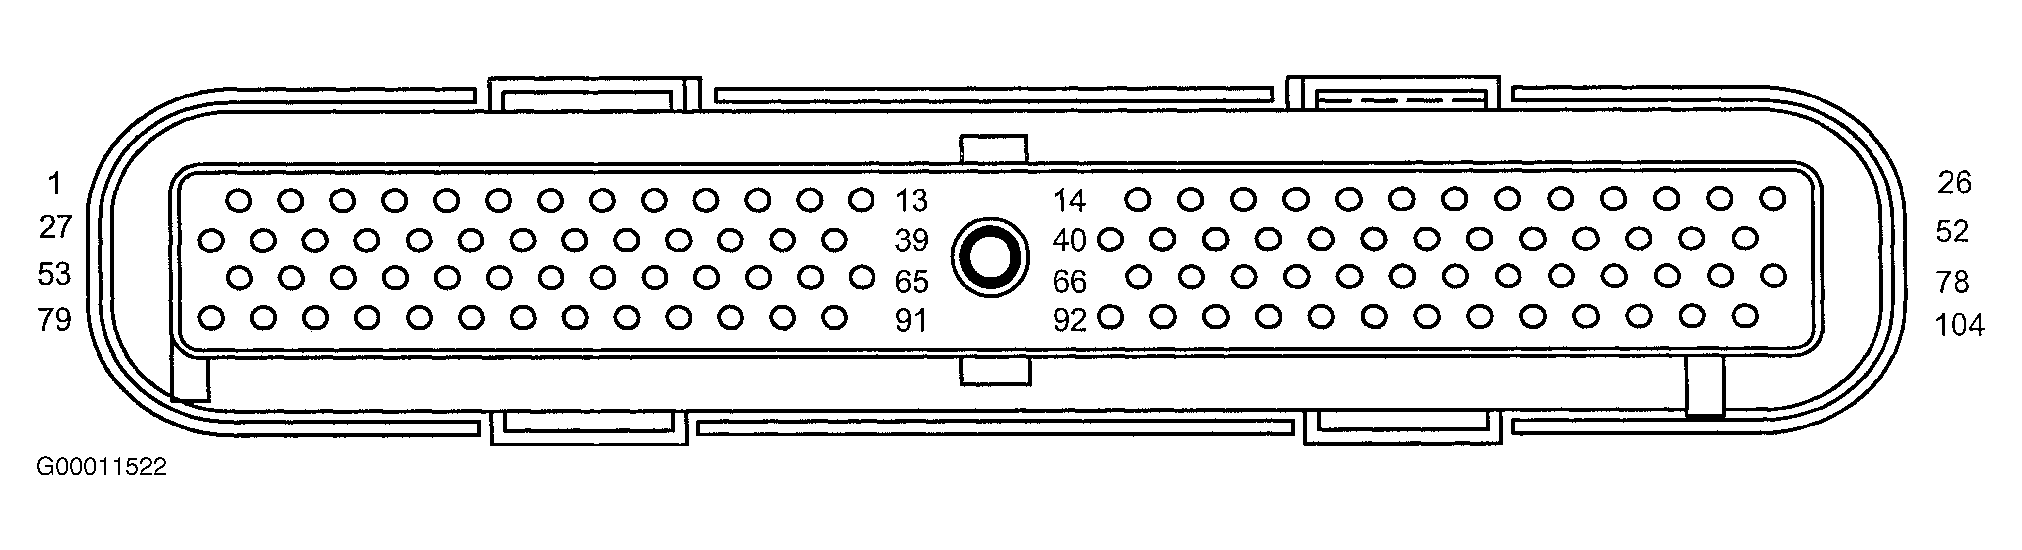
Turn ignition off. Disconnect PCM connector C175. Measure the resistance between the generator connector terminal No. 2 (Light Blue/Red wire) and the PCM connector C175 terminal No. 45, and between the generator connector terminal No. 2 (Light Blue/Red wire) and ground. See Fig 1
or Fig 2
and Fig 3
. Is the resistance less than 5 ohms between the generator and the PCM and greater than 10,000 ohms between the generator and ground? If yes, go to next step. If no, repair the circuit. Test the system for normal operation.
- Check GEN MON Circuit (Gray/Yellow wire) For An Open Or Short To Ground
Measure the resistance between the generator connector terminal No. 1 (Gray/Yellow wire) and the PCM connector C175 terminal No. 20, and between the generator connector terminal No. 1 (Gray/Yellow wire) and ground. See Fig 1
or Fig 2
and Fig 3
. Is the resistance less than 5 ohms between the generator and the PCM and greater than 10,000 ohms between the generator and ground? If yes, go to next step. If no, repair the circuit. Test the system for normal operation.
- Check For Correct PCM Operation
Disconnect PCM connector. Check for corrosion and pushed-out pins. Connect PCM connector and make sure it seats correctly. Operate the system and verify the concern is still present. Is the concern still present? If yes, install a new PCM. See COMPUTERIZED ENGINE CONTROLS in appropriate REMOVAL & INSTALLATION article in ENGINE PERFORMANCE. Test the system for normal operation. If no, the system is operating correctly at this time. The concern may have been caused by a loose or corroded connector. Clear the DTCs. Repeat the self-test. Test the system for normal operation.
 Courtesy of FORD MOTOR CO.
 Courtesy of FORD MOTOR CO.
 Courtesy of FORD MOTOR CO.