Driver's Window Motor Test
Driver's Window Motor TestMotor Test:
1. Remove the driver's door panel.
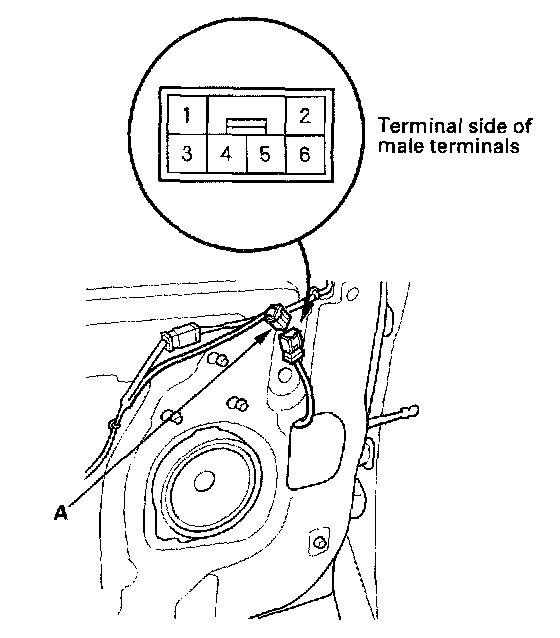
2. Disconnect the 6P connector (A) from the driver's window motor.
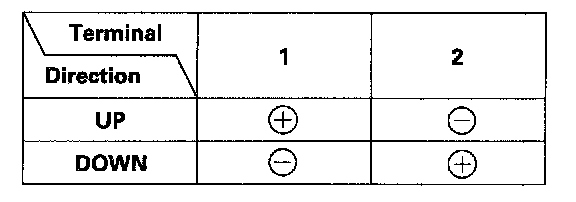
3. Test the motor in each direction by connecting battery power and ground according to the table.
NOTE: To prevent damage to the motor, disconnect one lead as soon as the motor stops running.
4. If the motor does not run or fails to run smoothly, replace it.
Pulser Test:
1. Reconnect the 6P connector to the window motor, and reconnect the 20P connector to the power window master switch.
2. Check for voltage between the terminals.
- There should be battery voltage between the No. 6 (+) and No.4 (-) terminals when the ignition switch is turned ON (II).
- Connect an analog voltmeter between the No.5 (+) and No.4 (-) terminals, and run the window motor down or up. The voltmeter needle should move back and forth alternately between 0 V and about 5 V (a digital voltmeter should show about 2.5 V).
- Connect an analog voltmeter between the No.3 (+) and No.4 (-) terminals, and run the window motor down or up. The voltmeter needle should move back and forth alternately between 0 V and about 5 V (a digital voltmeter should show about 2.5 V).