October 30: LEMON manuals on a temporary server, it is slow and having issues, download the manuals you need! Later in November we will switch back to the fast server.
Fuel Tank Unit Removal/Installation: Installation
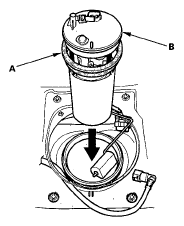
- Temporarily attach a new base gasket (A) to the fuel tank unit (B), then insert the fuel tank unit into the fuel tank.
NOTE:
- Be careful not to damage the new base gasket.
- Be careful not to bend the fuel gauge sending unit.
- Do not coat the base gasket with oil.
 Courtesy of AMERICAN HONDA MOTOR CO., INC.
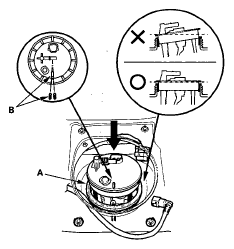
- Set the base gasket (A) from the fuel tank unit to the fuel tank.
 Courtesy of AMERICAN HONDA MOTOR CO., INC.
- Align the marks (B) on the fuel tank and the fuel tank unit, then insert the fuel tank unit into the fuel tank until the fuel tank unit rest on top of the sticking on a base gasket.
NOTE:
To avoid a fuel leak, check the base gasket, visually or by hand, to make sure it is not pinched.
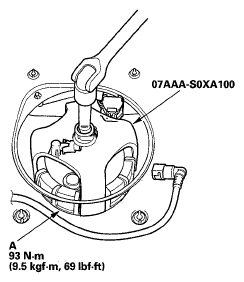
- Using the tool, tighten a new lock-nut (A) to the specified torque.
NOTE:
- After tightening, make sure the marks are still aligned.
- After installation, check the base gasket visually or by hand to be sure the gasket is not pinched.
 Courtesy of AMERICAN HONDA MOTOR CO., INC.
- Connect the fuel tank unit 5P connector, then connect the quick-connect fitting.
- Turn the ignition switch ON (II) (but do not operate the starter motor). The fuel pump will run for about 2 seconds, and fuel pressure will rise. Repeat this two or three times, then check that there is no leakage in the fuel supply system.
- Install the access panel.
- Install the center console (see CENTER CONSOLE REMOVAL/INSTALLATION
).
- Install the fuel fill cap.