September 30: LEMON manuals is back up on a temporary server! Slowness is possible
Front Engine Mount Removal and Installation: Removal
- Remove the air intake scoop (see step 1 on
INTAKE AIR RESONATOR REMOVAL/INSTALLATION
).
- Remove the A/C condenser fan shroud assembly, then remove the radiator fan shroud assembly (see
FAN, FAN MOTOR, AND SHROUD REMOVAL AND INSTALLATION
).
- Do the battery removal procedure (see
BATTERY REMOVAL AND INSTALLATION
).
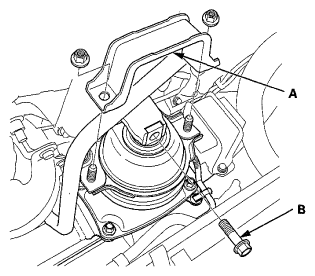
- Remove the front engine mount stop (A), then remove the front engine mount mounting bolt (B).
 Courtesy of AMERICAN HONDA MOTOR CO., INC.
- Lift and support the engine with a jack and a wood block under the engine/transmission.
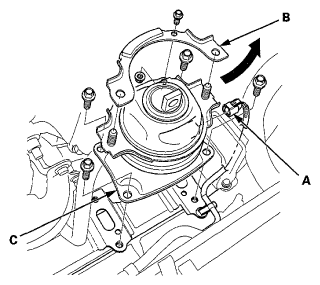
- Disconnect the front engine mount actuator connector (A), then remove the front engine mount bracket (B) and the front engine mount (C) as shown.
 Courtesy of AMERICAN HONDA MOTOR CO., INC.