Fuel Rails & Injectors: Installation
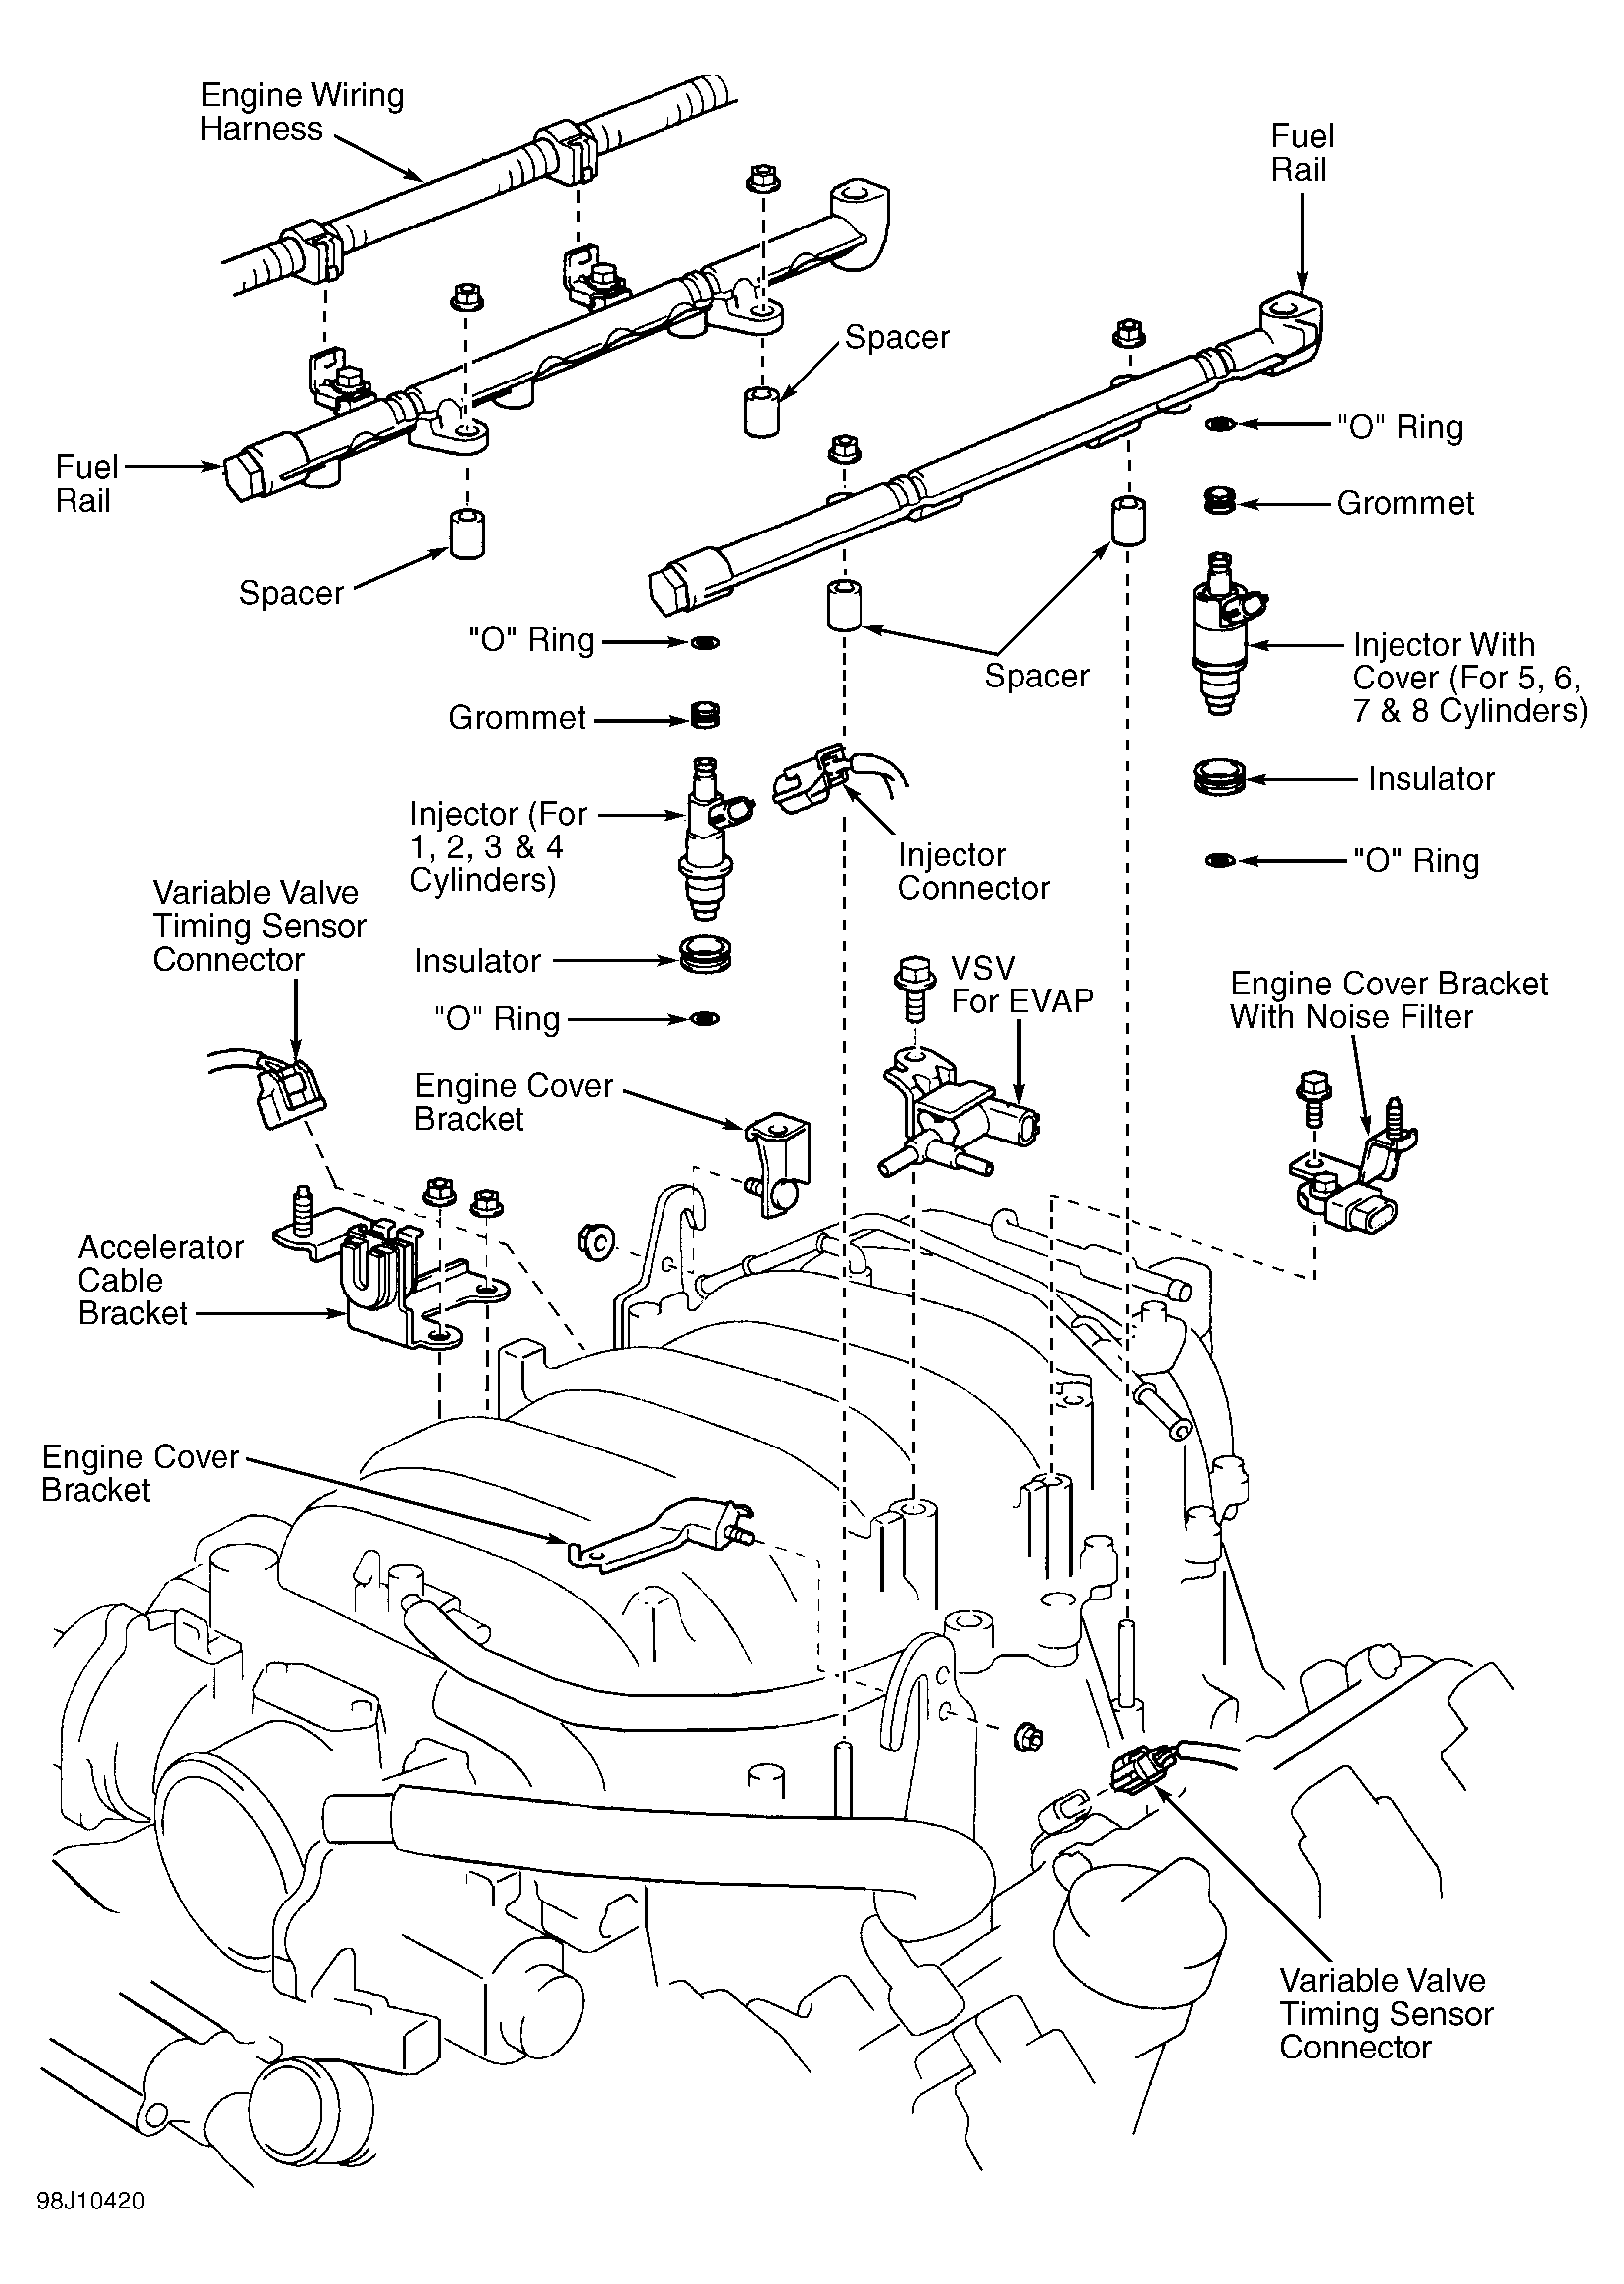
- Install NEW "O" rings, insulators and grommets on injectors. Apply a light coat of gasoline to fuel injector "O" rings and fuel rails injector openings. Using a twisting motion, push injectors onto fuel rail. Ensure injectors are fully seated. Ensure injector connectors are positioned outward.
- Place 4 fuel rail spacers in position on intake manifold. Apply a light coat of gasoline to intake manifold injector ports. Assemble fuel rails, fuel lines and injectors in position on intake manifold. Temporarily install 4 injector rail bolts. Temporarily install fuel line-to-intake manifold bolt. Ensure fuel injectors rotate smoothly. If injectors do not rotate smoothly, "O" rings were installed incorrectly. Replace "O" rings.
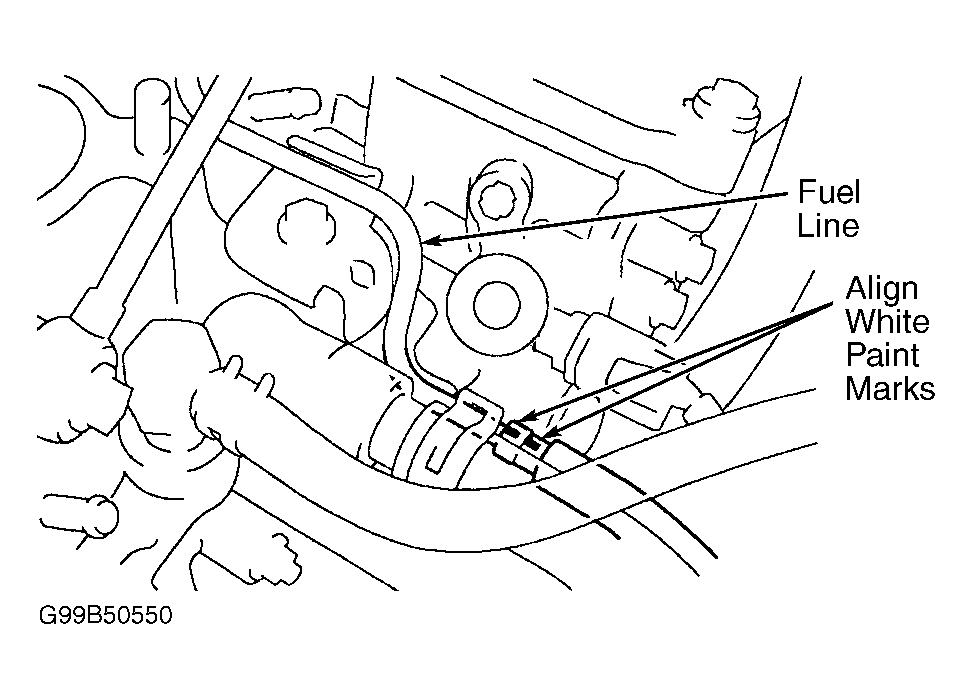
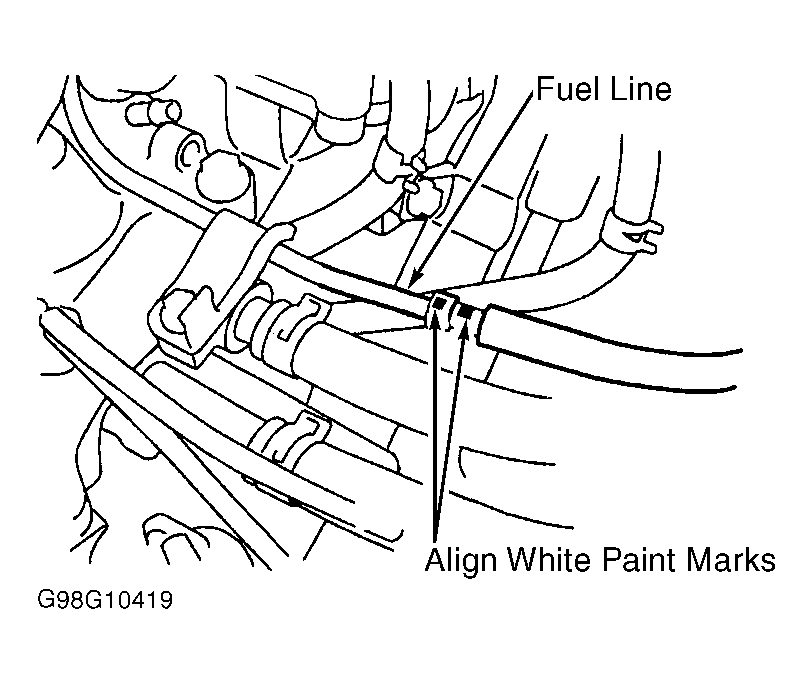
- Ensure fuel injector connectors are positioned outward. Tighten fuel rail-to-intake manifold bolts to specification. See TORQUE SPECIFICATIONS . Tighten fuel line-to-intake manifold bolt. Align alignment marks (White paint) on fuel line. See Fig 1. Install fuel line clamp to engine compartment fuel filter until a click is heard. Ensure fuel line clamp is installed securely.
- Connect air assist hoses to intake manifold. Install air assist pipe. Connect injector connectors. Install NEW intake chamber assembly gasket. Install air cleaner hose with resonator. To complete installation, reverse removal procedure. Tighten all bolts to specification. See TORQUE SPECIFICATIONS . Turn ignition on. Start engine and check fuel system for leaks.
 Courtesy of © TOYOTA, LICENSE AGREEMENT TMS1002
- Install NEW "O" rings, insulators and grommets on injectors. Apply a light coat of gasoline to fuel injector "O" rings. Apply a light coat of gasoline to fuel rail injector opening. Using a twisting motion, push injectors into fuel rail. Ensure injectors are fully seated in fuel rail. Ensure fuel injector connectors are positioned outward.
- Install 3 spacers in position on intake manifold. Apply a light coat of gasoline to intake manifold injector ports. Place injectors and fuel rail assembly onto intake manifold. Temporarily install fuel rail-to-intake manifold bolts.
- Ensure injectors rotate smoothly. If injectors do not rotate smoothly, "O" rings were installed incorrectly. Replace "O" rings. Position injector connectors upward. Connect injector connectors. Injector connectors for cylinders No. 1, 3 and 5 are Dark Gray, and for cylinders No. 2, 4 and 6 are Brown.
- Tighten fuel rail mounting bolts to specification. See TORQUE SPECIFICATIONS . Install fuel pressure pulsation damper and gaskets. See FUEL PRESSURE PULSATION DAMPER . To complete installation, reverse removal procedure. Fill cooling system. Start engine and inspect for fuel and coolant leaks.
- Install NEW insulators and grommets on injectors. Apply a light coat of gasoline to NEW fuel injector "O" rings. Install "O" rings. Using a twisting motion, push injectors into fuel rail. Ensure injectors are fully seated in fuel rail. Ensure fuel injector connectors are positioned outward.
- Install 4 spacers in position on intake manifold. Place injectors and fuel rail assembly onto intake manifold. Temporarily install fuel rail-to-intake manifold nuts.
- Ensure injectors rotate smoothly. If injectors do not rotate smoothly, "O" rings were installed incorrectly and may be pinched. Replace "O" rings. Position injector connectors outward. Tighten fuel rail mounting nuts to specification. See TORQUE SPECIFICATIONS .
- Install fuel pressure pulsation dampers and gaskets. See FUEL PRESSURE PULSATION DAMPER . To complete installation, reverse removal procedure. Fill cooling system. Start engine and inspect for fuel and coolant leaks.
- Install NEW insulators and grommets on injectors. Apply a light coat of gasoline to NEW fuel injector "O" rings. Install "O" rings. Using a twisting motion, push injectors into fuel rail. Ensure injectors are fully seated in fuel rail. Ensure fuel injector connectors are positioned outward. Install 4 spacers in position on intake manifold.
- Place injectors and fuel rail assembly onto intake manifold. Temporarily install fuel rail-to-intake manifold nuts. Ensure injectors rotate smoothly. If injectors do not rotate smoothly, "O" rings were installed incorrectly and may be pinched. Replace "O" rings. Position injector connectors outward. Tighten fuel rail mounting nuts to specification. See TORQUE SPECIFICATIONS .
- Connect injector connectors. Install fuel pressure pulsation dampers and gaskets. See FUEL PRESSURE PULSATION DAMPER . To complete installation, reverse removal procedure. Fill cooling system. Start engine and inspect for fuel and coolant leaks.
 Courtesy of © TOYOTA, LICENSE AGREEMENT TMS1002
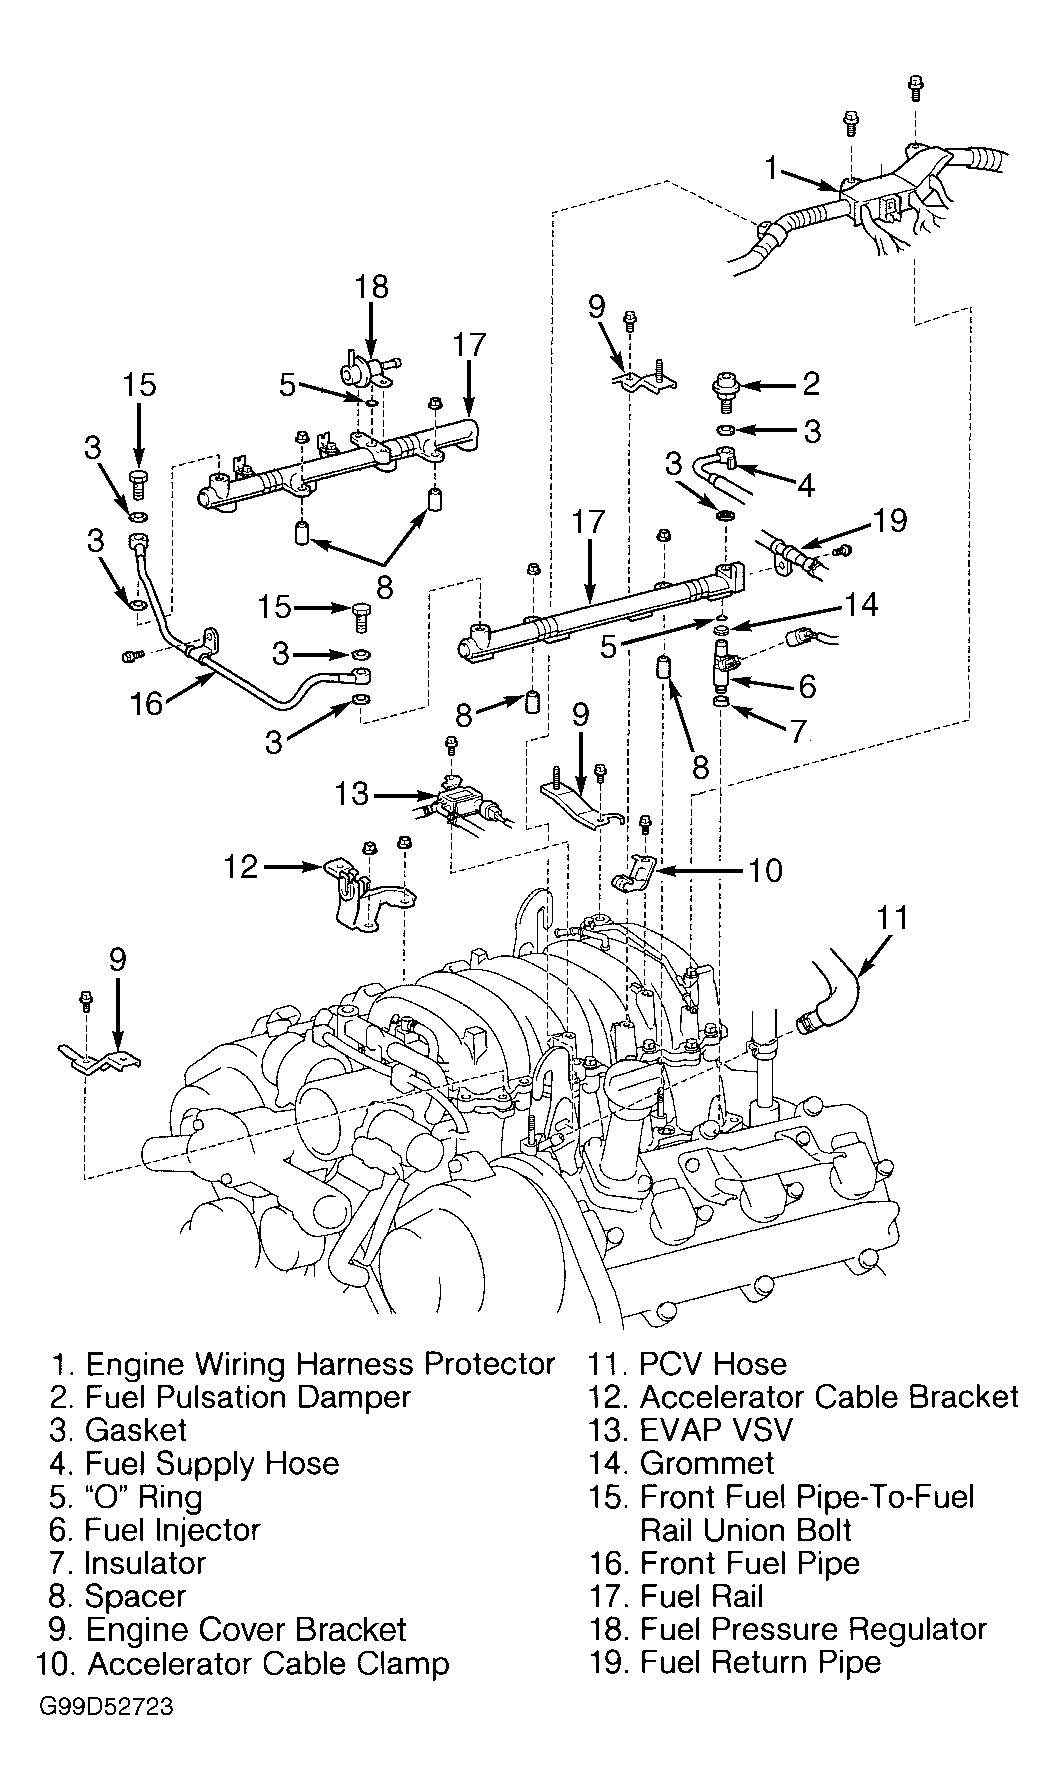
- Install NEW grommet on each fuel injector. Coat NEW "O" ring with gasoline and install "O" ring on each fuel injector. Use twisting motion when installing fuel injector on fuel rail. Position electrical connectors on fuel injectors toward outside of fuel rail. Ensure spacers and NEW insulators are installed on intake manifold.
- When installing fuel rails, install fuel rails with fuel injectors on intake manifold. Loosely install fuel rail-to-intake manifold nuts. Using NEW gaskets, install front fuel pipe and front fuel pipe-to-fuel rail union bolts on front of both fuel rails. Install front fuel pipe clamp bolt in clamp at center of front fuel pipe. Tighten front fuel pipe-to-fuel rail union bolts and front fuel pipe clamp bolt to specification. See TORQUE SPECIFICATIONS .
- Install clamp and fuel return pipe-to-fuel rail clamp bolt on rear of driver's side fuel rail. Tighten fuel return pipe-to-fuel rail clamp bolt to specification. See TORQUE SPECIFICATIONS .
- Ensure fuel injectors rotate smoothly. If fuel injectors fail to rotate smoothly, check for improper "O" ring installation. Ensure electrical connector on each fuel injector is facing toward outside of fuel rail.
- Tighten fuel rail-to-intake manifold nuts to specification. See TORQUE SPECIFICATIONS . To install remaining components, reverse removal procedure. Use NEW gaskets when installing fuel pulsation damper.
- Using a torque wrench and Steering Rack Wrench (09617-24011), tighten pulsation damper to specification. See TORQUE SPECIFICATIONS . Install negative battery cable. Operate fuel pump and check for fuel leaks.
 Courtesy of © TOYOTA, LICENSE AGREEMENT TMS1002
- Install NEW "O" rings, insulators and grommets on injectors. Apply a light coat of gasoline to fuel injector "O" rings and fuel rails injector openings. Using a twisting motion, push injectors onto fuel rail. Ensure injectors are fully seated. Ensure injector connectors are positioned outward.
- Place 4 fuel rail spacers in position on intake manifold. Apply a light coat of gasoline to intake manifold injector ports. Assemble fuel rails, fuel lines and injectors in position on intake manifold. Temporarily install 4 injector rail bolts. Temporarily install fuel line-to-intake manifold bolt. Ensure fuel injectors rotate smoothly. If injectors do not rotate smoothly, "O" rings were installed incorrectly. Replace "O" rings.
- Ensure injector connectors are positioned outward. Tighten fuel rail-to-intake manifold bolts to specification. See TORQUE SPECIFICATIONS . Tighten fuel line-to-intake manifold bolt. Align alignment marks (White paint) on fuel line. See Fig 1. Install fuel line clamp to engine compartment fuel filter until a click is heard. Ensure fuel line clamp is installed securely.
- Connect air assist hoses to intake manifold. Install air assist pipe. Connect injector connectors. Install NEW intake chamber assembly gasket. Install air cleaner hose with resonator. To complete installation, reverse removal procedure. Tighten all bolts to specification. See TORQUE SPECIFICATIONS . Turn ignition on. Start engine and check fuel system for leaks.
 Courtesy of © TOYOTA, LICENSE AGREEMENT TMS1002
- Install NEW brake booster union and intake chamber gaskets. Install NEW fuel pressure pulsation damper gasket. Install NEW "O" rings, insulators and grommets on injectors. Apply a light coat of gasoline to fuel injector "O" rings.
- Apply a light coat of gasoline to fuel rail injector opening. Using a twisting motion, push injectors into fuel rail. Ensure injectors are fully seated in fuel rail. Ensure fuel injector connectors are positioned outward.
- Install 3 spacers in position on intake manifold. Apply a light coat of gasoline to intake manifold injector ports. Place injectors and fuel rail assembly onto intake manifold. Temporarily install fuel rail-to-intake manifold bolts.
- Ensure injectors rotate smoothly. If injectors do not rotate smoothly, "O" rings were installed incorrectly. Replace "O" rings. Position injector connectors upward. Connect injector connectors. Injector connectors for cylinders No. 1, 3 and 5 are Dark Gray. Injector connectors for cylinders No. 2, 4 and 6 are Brown.
- To complete installation, reverse removal procedure. Tighten fuel rail mounting bolts to specification. See TORQUE SPECIFICATIONS . Fill cooling system. Start engine and check for fuel and coolant leaks.
- Install NEW upper and lower fuel pressure pulsation damper gaskets. Install NEW "O" rings, insulators and grommets on injectors. Apply a light coat of gasoline to fuel injector "O" rings. Using a twisting motion, push injectors into fuel rail.
- Ensure injectors are fully seated in fuel rail. Ensure fuel injector connectors are positioned outward. Install 4 spacers in position on intake manifold. Place injectors and fuel rail assembly onto intake manifold. Temporarily install fuel rail-to-intake manifold nuts.
- Ensure injectors rotate smoothly. If injectors do not rotate smoothly, "O" rings were installed incorrectly and may be pinched. Replace "O" rings. Position injector connectors outward. Tighten fuel rail-to-intake manifold nuts. Connect fuel injector connectors.
- To complete installation, reverse removal procedure. Tighten fuel rail mounting nuts to specification. See TORQUE SPECIFICATIONS . Start engine and inspect for fuel leaks.