Test B: Single Window Is Inoperative
- Use recorded results from Driver's Door Module (DDM) self-test performed in self-diagnostics. If DTC B1549 was retrieved, go to next step. If DTC B1402 was retrieved, go to step 4
. If no DDM DTCs were retrieved and all windows do not operate, go to step 7
. If no DDM DTCs were retrieved and passenger's windows do not operate, go to step 28
.
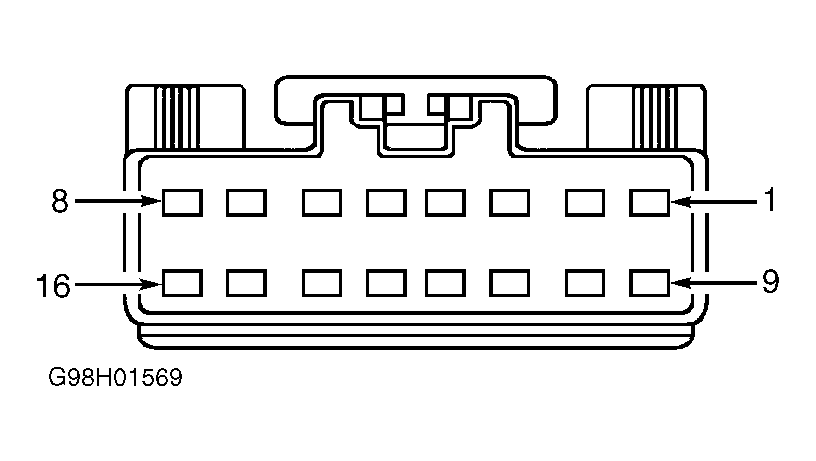
- Disconnect DDM harness connectors C521 and C522. Measure voltage at terminal No. 15 (Gray wire) at DDM harness connector C521. See Fig 1
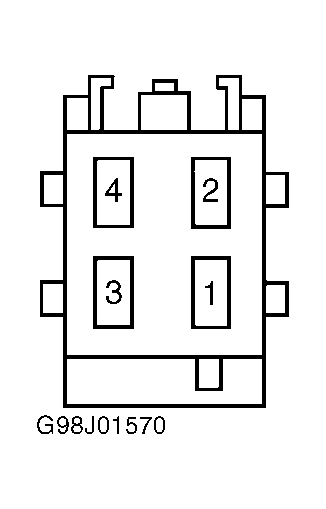
. Measure voltage at terminals No. 2 (Tan/Black wire) and No. 4 (White/Black wire) at DDM harness connector C522. See Fig 2
. If all voltage readings are greater than 5 volts, go to next step. If all voltage reading are 5 volts or less, replace driver's door module and retest system operation.
- Disconnect driver's door master window switch harness connector C511. Measure voltage at terminals No. 2 (Tan/Black wire) and No. 4 (White/Black wire) at DDM harness connector C522. Measure voltage at terminal No. 15 (Gray wire) at DDM harness connector C521. If any voltage reading is greater than 5 volts, repair short to voltage in appropriate wire. If all voltage readings are 5 volts or less, replace driver's door master window switch.
- Test driver's door master window switch. See DRIVER'S DOOR MASTER WINDOW SWITCH
under COMPONENT TESTS. If switch is okay, go to next step. If switch is defective, replace switch.
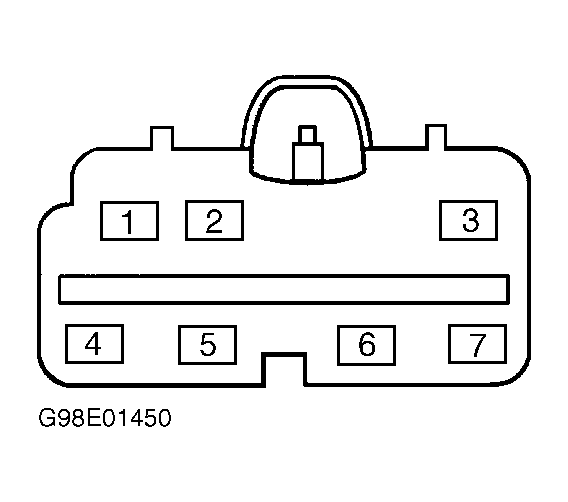
- Turn ignition switch to LOCK position. Disconnect DDM harness connector C522. Disconnect driver's door master window switch harness connector C511. Measure resistance in Tan/Black wire between terminal No. 2 at DDM harness connector C522 and terminal No. 5 at driver's door master window switch harness connector C511. See Fig 2
and Fig 3
. If resistance is 5 ohms or less, go to next step. If resistance is greater than 5 ohms, repair open in Tan/Black wire and retest system operation.
- Connect DDM harness connector C522. Disconnect DDM harness connector C521. Measure voltage at terminal No. 15 (Gray wire) at DDM harness connector C521. See Fig 1
. If voltage exists, repair short to voltage in Gray wire. If voltage does not exist, replace driver's door module.
- Turn ignition switch to RUN position. Using NGS tester, access DDM PID D_PW_SW. Press driver's door master window switch up and down several times. If PID agree with switch positions, go to next step. If PID does not agree with switch positions, go to step 12
.
- Turn ignition switch to LOCK position. Disconnect DDM harness connector C522. Disconnect driver's door master window switch harness connector C511. Disconnect driver's door window motor harness connector C510. Measure resistance in White/Black wire between driver's door window motor harness connector C510 and terminal No. 4 at driver's door master window switch harness connector C511. See Fig 3
. Measure resistance in Yellow wire between driver's door window motor harness connector C510 and terminal No. 1 at DDM harness connector C522. See Fig 2
. If both resistance readings are 5 ohms or less, go to next step. If either resistance reading is greater than 5 ohms, repair open in White/Black and/or Yellow wire.
- Connect driver's door master window switch harness connector C511 and DDM harness connector C522. Turn ignition switch to RUN position. Measure voltage at Yellow wire terminal at driver's door window motor harness connector C510 while pressing driver's door master window switch in DOWN position. If battery voltage exist, go to next step. If battery voltage does not, go to step 11
.
- Turn ignition switch to LOCK position. Disconnect DDM harness connector C522. Disconnect driver's door master window switch harness connector C511. Measure resistance between ground and White/Black wire terminal at driver's door window motor harness connector C510. Measure resistance between ground and Yellow wire terminal at driver's door window motor harness connector C510. If both resistance readings are greater than 10 k/ohms, replace driver's door window motor. If either resistance reading is 10 k/ohms or less, repair short to ground in White/Black and/or Yellow wire.
- Turn ignition switch to LOCK position. Disconnect DDM harness connector C522. Measure voltage at Yellow wire terminal at driver's door window motor harness connector C510. If voltage does not exist, go to step 47
. If voltage is exists, repair short to voltage in Yellow wire.
- Turn ignition switch to LOCK position. Disconnect DDM harness connector C522. Disconnect driver's door master window switch harness connector C511. Measure resistance in White/Black wire between terminal No. 4 at DDM harness connector C522 and terminal No. 4 at driver's door master window switch harness connector C511. Measure resistance in Tan/Black wire between terminal No. 2 at DDM harness connector C522 and terminal No. 5 at driver's door master window switch harness connector C511. See Fig 2
and Fig 3
. If both resistance readings are 5 ohms or less, go to next step. If either resistance reading is greater than 5 ohms, repair open in White/Black and/or Tan/Black wire.
- Measure resistance between ground and terminal No. 4 (White/Black wire) at DDM harness connector C522. Measure resistance between ground and terminal No. 2 (Tan/Black wire) at DDM harness connector C522. If both resistance readings are greater than 10 k/ohms, go to next step. If either resistance reading is 10 k/ohms or less, repair short to ground in White/Black and/or Tan/Black wire.
- Ensure driver's door master window switch harness connector C511 is disconnected. Disconnect DDM harness connector C521. Measure voltage at terminal No. 15 (Gray wire) at DDM harness connector C521. See Fig 1
. If voltage does not exist, go to next step. If voltage exists, repair short to voltage in Gray wire.
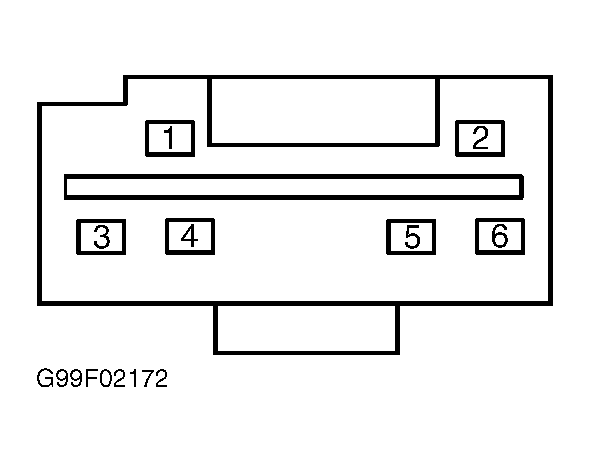
- Ensure DDM harness connector C522 is disconnected. Disconnect driver's door master window switch harness connector C506. Turn ignition switch to RUN position. Measure voltage at terminal No. 2 (Yellow/Light Green wire) at driver's door master window switch harness connector C506. See Fig 4
. If battery voltage exists, go to next step. If battery voltage does not exist, go to step 17
.
- Test driver's door master window switch. See DRIVER'S DOOR MASTER WINDOW SWITCH
under COMPONENT TESTS. If switch is okay, repair open in Black wire. If switch is defective, replace switch.
- Ensure DDM harness connector C522 and driver's door master window switch harness connector C506 are disconnected. Measure resistance in Yellow/Light Green wire between terminal No. 3 at DDM harness connector C522 and terminal No. 2 at driver's door master window switch harness connector C506. If resistance is 5 ohms or less, go to next step. If resistance is greater than 5 ohms, repair open in Yellow/Light Green wire.
- Measure resistance between ground and terminal No. 3 (Yellow/Light Green wire) at DDM harness connector C522. If resistance is greater than 10 k/ohms, go to next step. If resistance is 10 k/ohms or less, repair short to ground in Yellow/Light Green wire.
- Test delayed accessory relay/power window relay. See DELAYED ACCESSORY RELAY/POWER WINDOW RELAY
under COMPONENT TESTS. If relay is okay, go to next step. If relay is defective, replace relay.
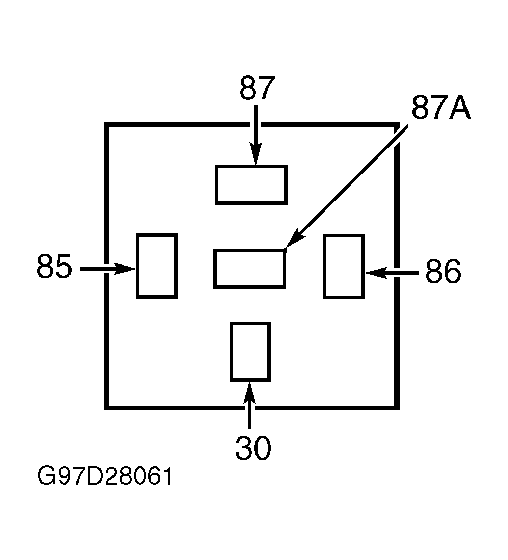
- Ensure DDM harness connector C522 is disconnected. Remove delayed accessory relay/power window relay from instrument panel fuse box. Measure resistance in Yellow/Light Green wire between terminal No. 3 at DDM harness connector C522 and terminal No. 87 at delayed accessory relay/power window relay harness connector. See Fig 2
and Fig 5
. If resistance is 5 ohms or less, go to next step. If resistance is greater than 5 ohms, repair open in Yellow/Light Green wire.
- Remove maxi-fuse No. 11 (40-amp) in power distribution box. Check fuse. If fuse is okay, go to next step. If fuse is blown, replace fuse and retest system operation. If fuse opens again, go to step 26
.
- Measure voltage at input side of maxi-fuse No. 11 (Black/Orange wire) in power distribution box. If battery voltage exists and vehicle is an Executive model, go to next step. If battery voltage exists and vehicle is a LTS, Signature, or Cartier model, go to step 24
. If battery voltage does not exist, repair open in Black/Orange wire.
- Ensure ignition switch is in LOCK position. Remove power window relay from instrument panel fuse box. Remove fuse No. 18 (7.5-amp) in instrument panel fuse box. Measure resistance in Black/White wire between output side of maxi-fuse No. 11 (40-amp) and terminal No. 30 at power window relay harness connector. Measure resistance in Dark Blue/Light Green wire between output side of fuse No. 18 (7.5-amp) in instrument panel fuse box and terminal No. 85 at power window relay harness connector. If both resistance readings are 5 ohms or less, go to step 25
. If either resistance reading is greater than 5 ohms, repair open in Black/White and/or Dark Blue/Light Green wire.
- Remove delayed accessory relay from instrument panel fuse box. Measure resistance in Black/White wire between output side of maxi-fuse No. 11 (40-amp) and terminal No. 30 at delayed accessory relay harness connector. Measure resistance in Black/White wire between output side maxi-fuse No. 11 (40-amp) and terminal No. 85 at delayed accessory relay harness connector. If both resistance readings are 5 ohms or less, go to next step. If either resistance reading is greater than 5 ohms, repair open in Black/White wire(s).
- Disconnect Lighting Control Module (LCM) harness connector C220. On Executive models, check resistance between ground and terminal No. 86 at power window relay connector. On LTS, Signature, and Cartier models, check resistance between ground and terminal No. 86 at delayed accessory relay connector. If resistance is 5 ohms or less on Executive models, system is okay at this time. If resistance is 5 ohms or less on LTS, Signature, and Cartier models, replace lighting control module. If either resistance is greater than 5 ohms, repair open in Black or Pink wire.
- On Executive models, check resistance between ground and terminal No. 85 (Dark Blue/Light Green wire) at power window relay connector. On LTS, Signature, and Cartier models, check resistance between ground and terminal No. 85 (Black/White wire) at delayed accessory relay connector. On all models, if resistance is greater than 10 k/ohms, go to next step. If resistance is 10 k/ohms or less, repair short to ground in Dark Blue/Light Green or Black/White wire.
- Ensure DDM harness connector C522 is disconnected. Ensure delayed accessory relay/power window relay is removed from instrument panel fuse box. Measure resistance between ground and terminal No. 3 (Yellow/Light Green wire) at DDM harness connector C522. If resistance is more than 10 k/ohms, replace driver's door master window switch and retest system operation. If resistance is 10 k/ohms or less, repair short to ground in Yellow/Light Green wire and retest system operation.
- Ensure driver's door master switch lock-out is not engaged. Operate each passenger's door window. If a passenger's door window still does not operate, go to next step. If all passenger's door windows operate, system is okay at this time.
- Test driver's door master window switch. See DRIVER'S DOOR MASTER WINDOW SWITCH
under COMPONENT TESTS. If switch is okay, go to next step. If switch is defective, replace switch and retest system operation.
- Operate all passenger's door windows. If all passenger's door windows do not operate, go to next step. If left rear passenger's door window does not operate, go to step 32
. If right front passenger's door does not operate, go to step 37
. If right rear passenger's door window does not operate, go to step 42
.
- Disconnect driver's door master window switch harness connector C511. Measure resistance between ground and terminal No. 3 (Red/Light Blue wire) at driver's door master window switch harness connector C511. If resistance is greater than 10 k/ohms, repair open in Red/Light Blue wire. If resistance is 10 k/ohms or less, repair short to ground in Red/Light Blue wire.
- Disconnect driver's door master window switch harness connector C506. Disconnect left rear passenger's door window switch harness connector C706. Measure resistance in Yellow/Light Blue wire between terminal No. 4 at driver's door master window switch harness connector C506 and terminal No. 3 at left rear passenger's door window switch harness connector C706. Measure resistance in Gray/Orange wire between terminal No. 3 at driver's door master window switch harness connector C506 and terminal No. 7 at left rear passenger's door window switch harness connector C706. If both resistance readings are 5 ohms or less, go to next step. If either resistance reading is greater than 5 ohms, repair open in Yellow/Light Blue and/or Gray/Orange wire.
- Measure resistance between ground and terminal No. 4 (Yellow/Light Blue wire) at driver's door master window switch harness connector C506. Measure resistance between ground and terminal No. 3 (Gray/Orange wire) at driver's door master window switch harness connector C506. If both resistance readings are greater than 10 k/ohms, go to next step. If either resistance reading is 10 k/ohms or less, repair short to ground in Yellow/Light Blue and/or Gray/Orange wire.
- Disconnect left rear passenger's door window motor harness connector C710. Measure resistance in Yellow/Red wire between left rear passenger's door window motor harness connector C710 and terminal No. 2 at left rear passenger's door window switch harness connector C706. Measure resistance in Red/Yellow wire between left rear passenger's door window motor harness connector C710 and terminal No. 6 at left rear passenger's door window switch harness connector C706. If both resistance readings are 5 ohms or less, go to next step. If either resistance reading is greater than 5 ohms, repair open in Yellow/Red and/or Red/Yellow wire.
- Measure resistance between ground and terminal No. 2 (Yellow/Red wire) at left rear passenger's door window switch harness connector C706. Measure resistance between ground and terminal No. 6 (Red/Yellow wire) at left rear passenger's door window switch harness connector C706. If both resistance readings are greater than 10 k/ohms, go to next step. If either resistance reading is 10 k/ohms or less, repair short to ground in Yellow/Red and/or Red/Yellow wire.
- Test left rear passenger's door window switch. See PASSENGER'S DOOR WINDOW SWITCH
under COMPONENT TESTS. If switch is okay, replace left rear passenger's door window motor. If switch is defective, replace switch.
- Disconnect driver's door master window switch harness connector C511. Disconnect right front passenger's door window switch harness connector C606. Measure resistance in White/Yellow wire between terminal No. 7 at driver's door master window switch harness connector C511 and terminal No. 7 at right front passenger's door window switch harness connector C606. Measure resistance in Tan/Light Blue wire between terminal No. 6 at driver's door master window switch harness connector C511and terminal No. 3 at right front passenger's door window switch harness connector C606. If both resistance readings are 5 ohms or less, go to next step. If either resistance reading is greater than 5 ohms, repair open in White/Yellow and/or Tan/Light Blue wire.
- Measure resistance between ground and terminal No. 7 (White/Yellow wire) at driver's door master window switch harness connector C511. Check resistance between ground and terminal No. 6 (Tan/Light Blue wire) at driver's door master window switch harness connector C511. If both resistance readings are greater than 10 k/ohms, go to next step. If either resistance reading is 10 k/ohms or less, repair short to ground in White/Yellow and/or Tan/Light Blue wire.
- Disconnect right front passenger's door window motor harness connector C610. Measure resistance in Yellow/Red wire between right front passenger's door window motor harness connector C610 and terminal No. 2 at right front passenger's door window switch harness connector C606. Measure resistance in Red/Yellow wire between right front passenger's door window motor harness connector C610 and terminal No. 6 at right front passenger's door window switch harness connector C606. If both resistance readings are 5 ohms or less, go to next step. If either resistance reading is greater than 5 ohms, repair open in Yellow/Red and/or Red/Yellow wire.
- Measure resistance between ground and terminal No. 2 (Yellow/Red wire) at right front passenger's door window switch harness connector C606. Check resistance between ground and terminal No. 6 (Red/Yellow wire) at right front passenger's door window switch harness connector C606. If both resistance readings are greater than 10 k/ohms, go to next step. If either resistance reading is 10 k/ohms or less, repair short to ground in Yellow/Red and/or Red/Yellow wire.
- Test right front passenger's door window switch. See PASSENGER'S DOOR WINDOW SWITCH
under COMPONENT TESTS. If switch is okay, replace right front passenger's door window motor. If switch is defective, replace switch.
- Disconnect driver's door master window switch harness connector C506. Disconnect right rear passenger's door window switch harness connector C806. Measure resistance in Yellow/Black wire between terminal No. 6 at driver's door master window switch harness connector C506 and terminal No. 7 at right rear passenger's door window switch harness connector C806. Measure resistance in Red/Black wire between terminal No. 5 at driver's door master window switch harness connector C506 and terminal No. 3 at right rear passenger's door window switch harness connector C806. If both resistance readings are 5 ohms or less, go to next step. If either resistance reading is greater than 5 ohms, repair open in Yellow/Black and/or Red/Black wire.
- Measure resistance between ground and terminal No. 6 (Yellow/Black wire) at driver's door master window switch harness connector C506. Measure resistance between ground and terminal No. 5 (Red/Black wire) at driver's door master window switch harness connector C506. If both resistance readings are greater than 10 k/ohms, go to next step. If either resistance reading is 10 k/ohms or less, repair short to ground in Yellow/Black and/or Red/Black wire.
- Disconnect right rear passenger's door window motor harness connector C810. Measure resistance in Yellow/Red wire between right rear passenger's door window motor harness connector C810 and terminal No. 2 at right rear passenger's door window switch harness connector C806. Measure resistance in Red/Yellow wire between right rear passenger's door window motor harness connector C810 and terminal No. 6 at right rear passenger's door window switch harness connector C806. If both resistance readings are 5 ohms or less, go to next step. If either resistance reading is greater than 5 ohms, repair open in Yellow/Red and/or Red/Yellow wire.
- Measure resistance between ground and terminal No. 2 (Yellow/Red wire) at right rear passenger's door window switch harness connector C806. Measure resistance between ground and terminal No. 6 (Red/Yellow wire) at right rear passenger's door window switch harness connector C806. If both resistance readings are greater than 10 k/ohms, go to next step. If either resistance reading is 10 k/ohms or less, repair short to ground in Yellow/Red and/or Red/Yellow wire.
- Check right rear passenger's door window switch. See PASSENGER'S DOOR WINDOW SWITCH
under COMPONENT TESTS. If switch is okay, replace right rear passenger's door window motor. If switch is defective, replace switch.
- Disconnect DDM harness connector C522. Disconnect driver's door window motor harness connector C510. Measure resistance in Yellow wire between terminal No. 1 at DDM harness connector C522 and driver's door window motor connector C510. If resistance is 5 ohms or less, replace driver's door module. If resistance is greater than 5 ohms, repair open in Yellow wire.
 Courtesy of FORD MOTOR CO.
 Courtesy of FORD MOTOR CO.
 Courtesy of FORD MOTOR CO.
 Courtesy of FORD MOTOR CO.
 Courtesy of FORD MOTOR CO.