October 30: LEMON manuals on a temporary server, it is slow and having issues, download the manuals you need! Later in November we will switch back to the fast server.
Power Outer Mirror Inspection
- Disconnect the negative battery cable.
- Remove the inner garnish. (See
INNER GARNISH REMOVAL/INSTALLATION
).
- Disconnect the power outer mirror connector.
- Remove the front door trim. (See
FRONT DOOR TRIM REMOVAL/INSTALLATION
).
- Apply battery positive voltage and connect the ground to the power outer mirror terminals and inspect the power outer mirror operation.
- If the power outer mirror does not operate as indicated in the table, replace it.
| Mirror operation direction |
Terminal |
| B+ |
Ground |
| Up |
G |
H |
| Down |
H |
G |
| Left |
I |
H |
| Right |
H |
I |
- Apply battery voltage to power outer mirror connector terminal A, and connect terminal C to ground.
- If not as indicated in the table, or if the resistance is not within the specification, replace the power outer mirror.
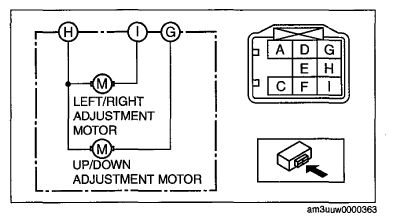 Courtesy of MAZDA MOTORS CORP.