Removal and Installation: Removal
- Set vehicle to the straight ahead-position.
- Remove combination switch and spiral cable. Refer to
SPIRAL CABLE
.
- Remove instrument lower finisher. Refer to
"COMPONENT PARTS
".
- Disconnect each switch connectors installed to steering column assembly, and then disconnect harness from steering column assembly.
- Remove bolt of intermediate shaft (upper side), and then remove intermediate shaft from steering column assembly.
- Remove steering column assembly nuts, then remove steering column assembly from vehicle.
- Remove intermediate shaft (lower side) from steering gear assembly with the following procedure.
CAUTION:
- Never deform or bend the holder.
- Never replace the intermediate shaft if the holder is deformed or bent.
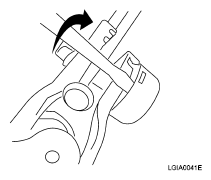
- Insert a suitable tool between the cover and the holder. Then push the cover down in the direction shown in illustration and remove the cover.
- Remove bolt.
 Courtesy of NISSAN MOTOR CO., U.S.A.
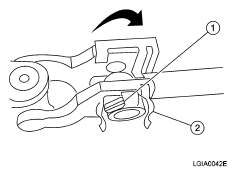
- Rotate the cam nut in direction shown in illustration. Align the cam nut V-shaped groove (1) with the holder (2) V-guide. Fit the cam nut to the holder V-guide, then remove the cam nut from the holder.
CAUTION:
- Rotate the cam nut if the nut becomes misaligned as shown in illustration. Align the cam nut V-shaped groove with the holder V-guide.
- Their are two different grooves, but only one that fits the holder V-guide.
 Courtesy of NISSAN MOTOR CO., U.S.A.
- Remove the intermediate shaft by removing the holder pawl from the pinion shaft groove (A) and slide out the intermediate shaft using a suitable tool.
 Courtesy of NISSAN MOTOR CO., U.S.A.