- Install clevis pin and shift collar to L-H shift fork after assembling them.
CAUTION:
Use caution when installing L-H shift fork, clevis pin or shift collar.
- Install clevis pin and shift collar to 2-4 shift bracket after assembling them.
CAUTION:
Use caution when installing 2-4 shift bracket.
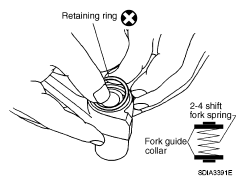
- Install the fork guide collar and 2-4 shift fork spring to the 2-4 shift fork, and then secure it with the retaining ring.
CAUTION:
- Do not reuse retaining ring.
- Be careful with orientation.
 Courtesy of NISSAN NORTH AMERICA, INC.
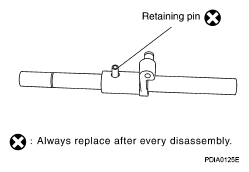
- Install the 2-4shift bracket to the L-H shift rod.
- Install the retaining pin evenly to the L-H shift rod.
CAUTION:
Do not reuse retaining pin.
 Courtesy of NISSAN NORTH AMERICA, INC.
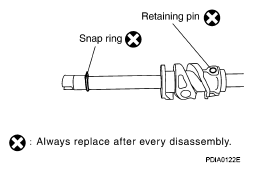
- Install the drum cam to the control shift rod, and then secure it with the retaining pin.
CAUTION:
Do not reuse retaining pin.
- Install the snap ring to the control shift rod.
CAUTION:
Do not reuse snap ring.
 Courtesy of NISSAN NORTH AMERICA, INC.