Diagnosis & Repair (Using Toyota Scan Tool)
- Check EVAP VSV, vapor pressure sensor VSV and vapor pressure sensor wiring harness connectors for damaged pins, corrosion and loose wires. For component locations, see appropriate illustration in THEORY/OPERATION
article. Repair connectors as necessary. If connectors are okay, go to next step.
- Check all EVAP related vacuum hoses for cracks, looseness and correct routing. Replace vacuum hoses as necessary. If vacuum hoses are okay, go to next step. For proper vacuum hose routing, see appropriate illustration in VACUUM DIAGRAMS
article.
- Access ECM behind glove box. Turn ignition on. Backprobing ECM connector, measure voltage between terminals No. 11 (Light Green/Red wire) and No. 9 (Brown wire) at ECM E6 connector. See Figure. If voltage is 4.5-5.5 volts, go to next step. If voltage is not 4.5-5.5 volts, replace ECM.
- Backprobe ECM connector. Measure voltage between terminals No. 12 (Yellow/Black wire) and No. 9 (Brown wire) at ECM E6 connector. Disconnect vacuum hose from vapor pressure sensor. Sensor is located in right rear of engine compartment. Connect a vacuum pump to sensor. If voltage is 3.0-3.6 volts without vacuum applied and 1.3-2.1 volts with .59 in. Hg (2 kPa) vacuum applied, go to step 6). If voltage is not as specified, go to next step.
- Check for open or short circuit in wiring harness between vapor pressure sensor and ECM. See appropriate wiring diagram in WIRING DIAGRAMS
article. Repair wiring as necessary. If wiring harness is okay, replace vapor pressure sensor.
- Using scan tool, select ACTIVE TEST mode. Disconnect EVAP VSV-to-charcoal canister vacuum hose. See Fig 1. Start engine. Place finger over end of disconnected vacuum hose. With EVAP VSV on, suction should be present. With VSV off, no suction should be present. If VSV operates as specified, go to step 11). If VSV does not operate as specified, go to next step.
 Courtesy of © TOYOTA, LICENSE AGREEMENT TMS1002
- Check vacuum hose between intake manifold and EVAP VSV, and vacuum hose between EVAP VSV and charcoal canister. Check for correct routing, damage, blockage and for proper connections. Replace vacuum hoses as necessary. If vacuum hoses are okay, go to next step.
- Turn ignition off. Access EVAP VSV. VSV is located near air duct hose for air cleaner. Disconnect VSV connector. Using ohmmeter, measure resistance between valve terminals. Resistance should be 27-33 ohms at 68°F (20°C). Measure resistance between each terminal and VSV body. Resistance should be infinite. Replace VSV as necessary. If resistance is as specified, go to next step.
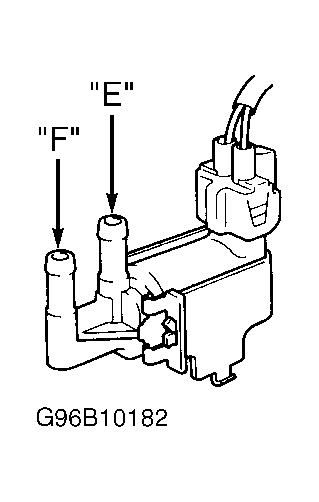
- Connect battery voltage to VSV connector terminals. Apply air pressure to VSV port "E". See Fig 2. Air from port "E" should flow from port "F". Remove battery voltage. Air from port "E" should not flow from port "F". Replace VSV as necessary. If VSV operates as specified, go to next step.
- Check for open or short circuit in wiring harness between EFI relay and ECM. See appropriate wiring diagram in WIRING DIAGRAMS
article. Repair wiring as necessary. If wiring harness is okay, replace ECM.
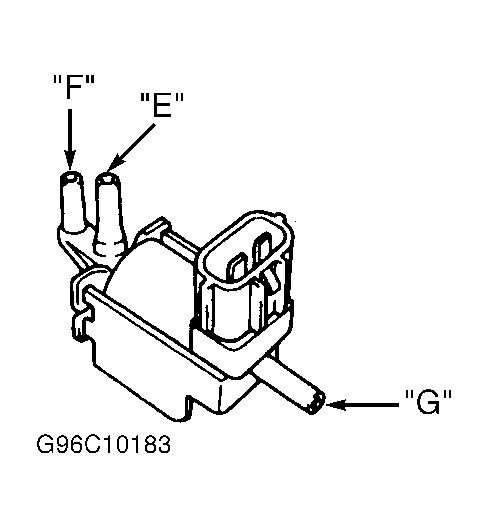
- Disconnect vapor pressure sensor VSV vacuum hoses. VSV is located near right shock tower. Apply air pressure to VSV port "E". See Fig 3. Air from port "E" should flow from port "G" only. Using scan tool, select ACTIVE TEST mode. With VSV on, air from port "E" should flow from port "F". If VSV operates as specified, go to step 14). If VSV does not operate as specified, go to next step.
- Check vapor pressure sensor VSV. See appropriate SYSTEM/COMPONENT TESTS
article. Replace VSV as necessary. If VSV is okay, go to next step.
- Check for open or short in wiring harness between EFI main relay, vapor pressure sensor VSV and ECM. See appropriate wiring diagram in WIRING DIAGRAMS
article. Repair wiring as necessary. If wiring harness is okay, replace ECM.
- Disconnect vapor pressure sensor VSV connector. Using scan tool, select ACTIVE TEST mode. Backprobe ECM connector. Measure voltage between terminals No. 12 (Yellow/Black wire) and No. 9 (Brown wire) at ECM E6 connector. With EVAP VSV on, voltage should be 2 volts or less. If voltage is as specified, go to step 16). If voltage is not as specified, go to next step.
- Check vacuum hose between charcoal canister and vapor pressure sensor VSV, and vacuum hose between vapor pressure sensor VSV and vapor pressure sensor. Check for correct routing, damage, blockage and for proper connections. Replace vacuum hoses as necessary. If vacuum hoses are okay, go to next step.
- Remove fuel tank cap. Disconnect vapor pressure sensor VSV connector. Using scan tool, select ACTIVE TEST mode. Start engine. Using scan tool, switch EVAP VSV on. Backprobe ECM connector. Measure voltage between terminals No. 12 (Yellow/Black wire) and No. 9 (Brown wire) at ECM E6 connector 5 seconds after switching EVAP VSV from on to off. If voltage is 2.5 volts or less, replace charcoal canister. If voltage is more than 2.5 volts, go to next step.
- Check charcoal canister. See appropriate SYSTEM/COMPONENT TESTS
article. Replace charcoal canister as necessary. If charcoal canister is okay, replace ECM.
 Courtesy of © TOYOTA, LICENSE AGREEMENT TMS1002
 Courtesy of © TOYOTA, LICENSE AGREEMENT TMS1002