Air Intake Control System: Camry
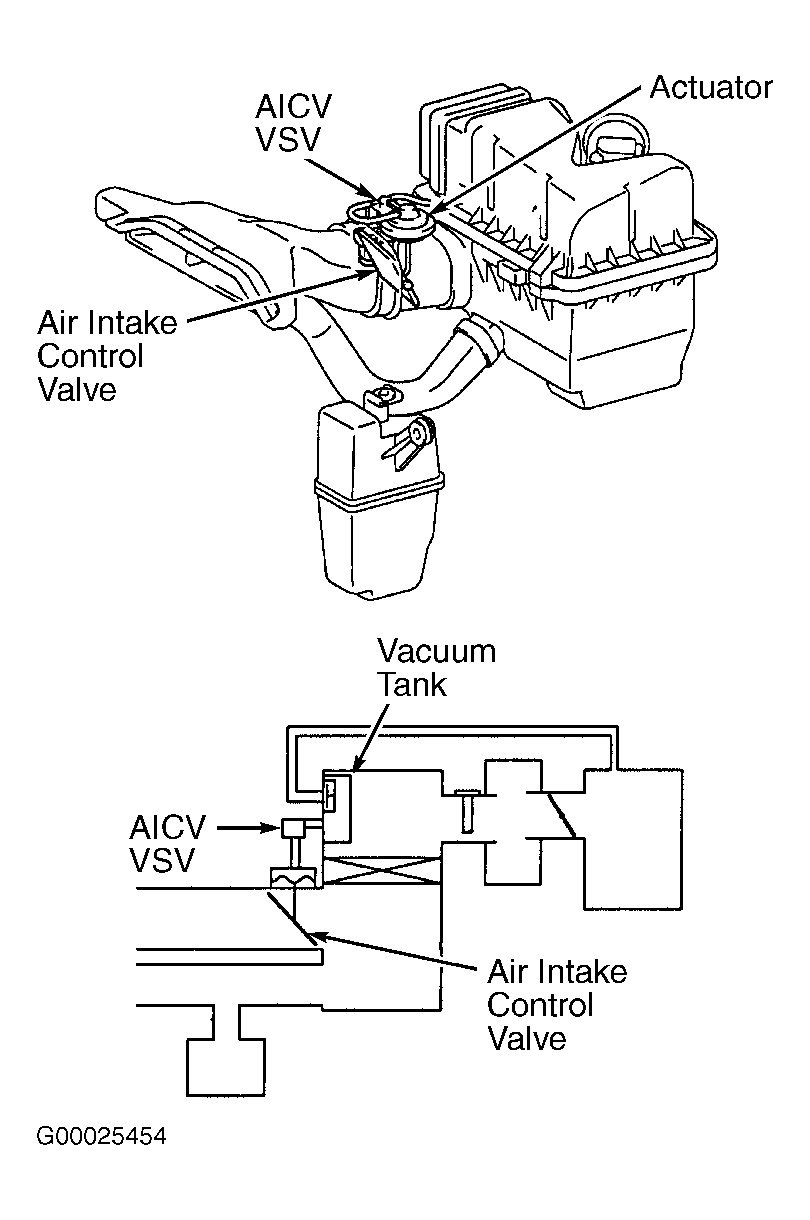
- Disconnect electrical connector and vacuum hoses from Air Intake Control Valve (AICV) Vacuum Switching Valve (VSV). See Figure, Figure and Fig 1
.
- Using ohmmeter, check that continuity exists between electrical terminals on AICV VSV and that resistance is 37-44 ohms at 68°F (20°C). If continuity exists and resistance is within specification, go to next step. If no continuity exists or resistance is not within specification, replace AICV VSV.
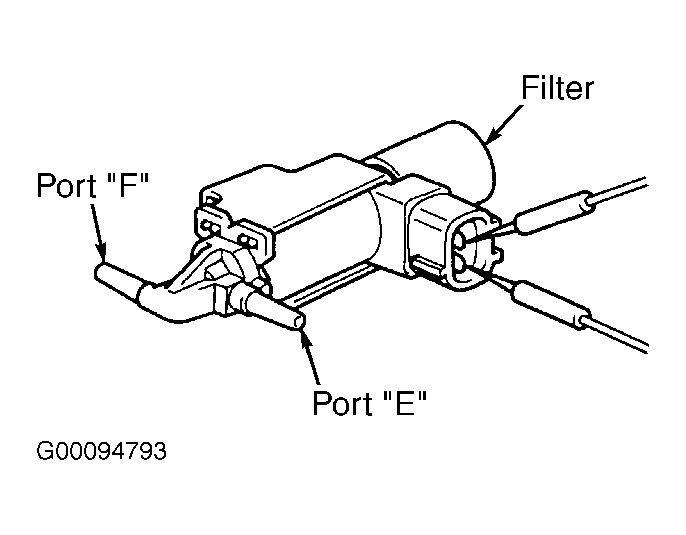
- Apply air pressure to port "E" on AICV VSV. Ensure air flows from the filter. See Fig 2.
- Apply battery voltage and ground to electrical terminals on AICV VSV. Apply air pressure to port "E" on AICV VSV. Ensure air flows from port "F". See Fig 2. If AICV VSV operates properly, reinstall electrical connector and vacuum hoses on AICV VSV. Go to next step. If AICV VSV does not operate properly, replace AICV VSV.
- For models produced up to January 2003, disconnect vacuum hose at actuator for air intake control valve. See Figure, Figure and Fig 1
. Using vacuum pump, apply 7.9 in. Hg of vacuum to actuator. Ensure actuator rod moves and does not return to original position for at least one minute. If actuator operates properly, reconnect vacuum hose. Go to next step. If actuator does not operate properly, replace actuator.
- For models produced in January 2003 and later, disconnect vacuum hose from actuator valve No. 3, located on air cleaner case. Using vacuum pump, apply 7.9 in. Hg of vacuum to actuator valve. Ensure actuator valve opens and remains opened for at least one minute. If actuator valve operates properly, reconnect vacuum hose and go to next step. If actuator valve does not operate properly, replace actuator valve.
- On all models, remove glove box for access to Engine Control Module (ECM). For illustration of ECM location, see ENGINE CONTROL MODULE under COMPONENT LOCATIONS. Note ECM electrical connector terminal identification. See Figure. Turn ignition on. Using voltmeter, check voltage between terminals No. 25 (on models produced before January 2003), or No. 33 (on models produced after January 2003), and No. 28 at ECM electrical connector E10. These are the AICV and E2 terminals at ECM.
- Voltage should be 9-14 volts. If voltage is within specification, go to next step. If voltage is not within specification, check for open and short in wiring harness and connectors between EFI main relay, AICV VSV and ECM. EFI main relay is located in fuse/relay box at driver's side front corner of engine compartment and may also be referred to as EFI relay. See appropriate WIRING DIAGRAM under ENGINE PERFORMANCE in SYSTEM WIRING DIAGRAMS article.
- Disconnect hoses from vacuum tank. Vacuum tank is located on upper cap on air cleaner assembly. See Figure. Note ports on vacuum tank. See Figure. Plug port "C" on vacuum tank. Apply air pressure to port "B". Ensure air flows from port "A".
- Plug port "C". Apply air pressure to port "A". Ensure air does not flow from port "B". Plug ports "A" and "C". Using vacuum pump, apply 18 in. Hg of vacuum to port "B". Ensure vacuum reading will hold for at least one minute. If vacuum tank is okay, reconnect vacuum hoses and go to next step. If vacuum tank is defective, replace vacuum tank or upper cap on air cleaner assembly as necessary.
- Check ECM ground circuit. See ENGINE PERFORMANCE in SYSTEM WIRING DIAGRAMS article in ELECTRICAL. If ECM ground circuit is okay, replace ECM. If ECM is replaced and vehicle is equipped with engine immobilizer system, ECM must be programmed with proper ignition key code for engine immobilizer system. Models equipped with engine immobilizer system may be identified by looking at the ignition key. On models equipped with engine immobilizer system, the top of the ignition key is thicker than a standard ignition key, as a transponder chip is incorporated into the top of the ignition key. For programming procedures, see COMPUTER RELEARN PROCEDURES - TOYOTA
article in GENERAL INFORMATION, or appropriate ENGINE IMMOBILIZER SYSTEMS article in ACCESSORIES & EQUIPMENT.
 Courtesy of © TOYOTA, LICENSE AGREEMENT TMS1002
 Courtesy of © TOYOTA, LICENSE AGREEMENT TMS1002