Headlight Dimmer Switch: Inspection: Inspection
WARNING: This page is about a different car, the 2011 Toyota Avalon. However, it is still accessible from the selected car via links, so may be relevant.
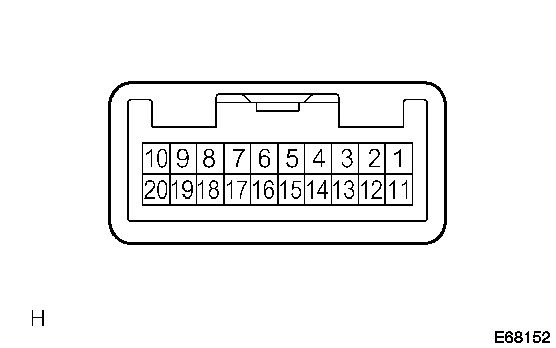
- INSPECT HEADLIGHT DIMMER SWITCH ASSEMBLY
- Inspect the light control switch.
 Courtesy of © TOYOTA, LICENSE AGREEMENT TMS1002
- Measure the resistance according to the value(s) in the table below.
Standard resistance
| Tester Connection |
Switch Condition |
Specified Condition |
| 12 - 18 - 20 - 19 |
OFF |
10 kΩ or higher |
| 12 - 18 |
TAIL |
Below 1 Ω |
| 12 - 18 - 20 |
HEAD |
Below 1 Ω |
| 12 - 19 |
AUTO |
Below 1 Ω |
- Inspect the headlight dimmer switch.
- Measure the resistance according to the value(s) in the table below.
Standard resistance
| Tester Connection |
Switch Condition |
Specified Condition |
| 12 - 11 - 17 |
FLASH |
Below 1 Ω |
| 12 - 16 |
LOW BEAM |
Below 1 Ω |
| 12 - 11 |
HI BEAM |
Below 1 Ω |
- Inspect the turn signal switch.
- Measure the resistance according to the value(s) in the table below.
Standard resistance
| Tester Connection |
Switch Condition |
Specified Condition |
| 12 - 13 |
Right turn |
Below 1 Ω |
| 15 - 12 - 13 |
Neutral |
10 kΩ or higher |
| 15 - 12 |
Left turn |
Below 1 Ω |
- Inspect the front fog light switch.
- Measure the resistance according to the value(s) in the table below.
Standard resistance
| Tester Connection |
Switch Condition |
Specified Condition |
| 3 - 4 |
OFF |
10 kΩ or higher |
| 3 - 4 |
Fog light switch ON |
Below 1 Ω |