- Check fuses. Turn key OFF. Check the 10A RLY COIL fuse and the 10A ELECTRON IGN fuse located in the interior fuse junction panel. Are the fuses OK? If yes, go to step 4
. If no, go to next step.
- Check system. Turn key OFF. Replace the blown fuse(s). Turn key ON. Do any of the fuses fail again? If yes, go to next step. If no, go to step 4
.
- Check for short to ground. Turn key OFF. Remove the 10A RLY COIL fuse and/or the 10A ELECTRON IGN fuse(s). Disconnect the transmission range switch connectors and the speed control actuator switch connector. Remove the speed control (ASCD HOLD) relay from the left hand engine compartment relay panel. See COMPONENT LOCATIONS
. Measure the resistance of the Light Green wire between the right hand terminal of the 10A ELECTRON IGN fuse holder and ground. Measure the resistance of the Blue wire between the right hand terminal of the 10A RLY COIL fuse holder and ground. See WIRING DIAGRAMS
. Is (are) the resistance(s) less than 5 ohms? If yes, service the wire in question. If no, replace blown fuses and go to the next step.
- Check power supply to ASCD hold relay and speed control actuator switch. Turn key OFF. Remove the ASCD hold relay and disconnect the speed control actuator switch connector. Turn key ON. Measure the voltage on the Blue wire at the ASCD hold relay connector. Measure the voltage on the Blue wire at the speed control actuator switch connector. See WIRING DIAGRAMS
. Are the voltages greater than 10 volts? If yes, reconnect the speed control actuator switch and ASCD hold relay and go to next step. If no, service Blue wire.
- Check power supply to speed control module. Turn key OFF. Disconnect the speed control module connector located in the center instrument panel finish panel. Turn key ON. Measure the voltage on the Green/White wire at the speed control module connector under the specified conditions. See SPEED CONTROL MODULE VOLTAGE
table. See WIRING DIAGRAMS
. Are the voltages OK? If yes, go to step 11
. If no, go to next step.
SPEED CONTROL MODULE VOLTAGE
| Speed Control Actuator Switch |
Voltage |
| Depress & Hold ON |
Greater Than 10 Volts |
| Released After Held ON |
Greater Than 10 Volts |
| Depress & Hold OFF |
Less Than 1 Volt |
| Released After Held OFF |
Less Than 1 Volt |
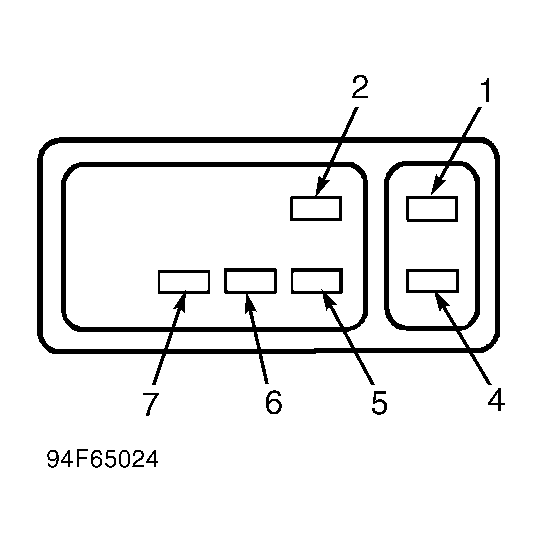
- Check speed control actuator switch. Turn key OFF. Disconnect the speed control actuator switch connector. Measure the resistance between the specified wire terminals on the speed control actuator switch, with the speed control actuator switch. See Fig 1
and SPEED CONTROL ACTUATOR SWITCH RESISTANCE
. See WIRING DIAGRAMS
. Are the resistances OK? If yes, go to next step. If no, replace the speed control actuator switch. See SPEED CONTROL ACTUATOR SWITCH
under REMOVAL & INSTALLATION.
SPEED CONTROL ACTUATOR SWITCH RESISTANCE
| Speed Control Switch Position |
Wire Terminals |
Resistance |
| ON |
5 & 7, 5 & 4; 7 & 4 |
Less Than 5 ohms |
| Neutral |
5 & 4 |
Less Than 5 ohms |
| OFF |
5 & 7, 5 & 4; 7 & 4 |
Greater Than 10,000 ohms |
 Courtesy of FORD MOTOR CO.
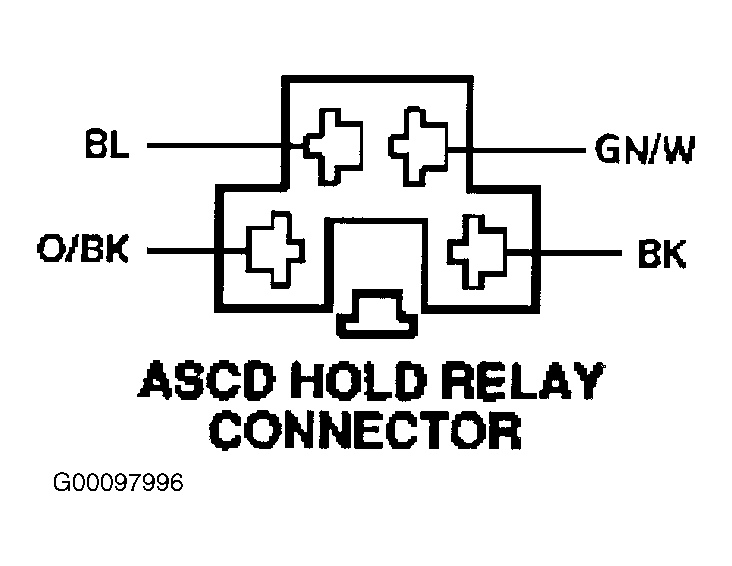
- Check wires between speed control actuator switch and ASCD hold relay. Turn key OFF. Disconnect the speed control actuator switch connector, the speed control module connector, the inhibit relay, and remove the ASCD hold relay. Measure the resistance of the Orange/Black wire between the ASCD hold relay connector and the speed control actuator switch connector. See Fig 2
. Measure the resistance of the Green/White wire between the ASCD hold relay connector and the speed control actuator switch connector. Measure the resistance of the Orange/Black wire between the speed control actuator switch connector and ground. Measure the resistance of the Green/White wire between the speed control actuator switch connector and ground. See WIRING DIAGRAMS
. Are the resistances less than 5 ohms between the ASCD hold relay and the speed control actuator switch, and greater than 10,000 ohms between the speed control actuator switch and ground? If yes, go to next step. If no, service the wire(s) in question.
- Check ASCD hold relay ground. Turn key OFF. Reconnect the speed control actuator switch connector, the speed control module connector, and the inhibit relay. Remove the ASCD hold relay. Measure the resistance of the Black wire between the ASCD hold relay connector and ground. See Fig 2
. See WIRING DIAGRAMS
. Is the resistance less than 5 ohms? If yes, go to next step. If no, service the Black wire.
 Courtesy of FORD MOTOR CO.
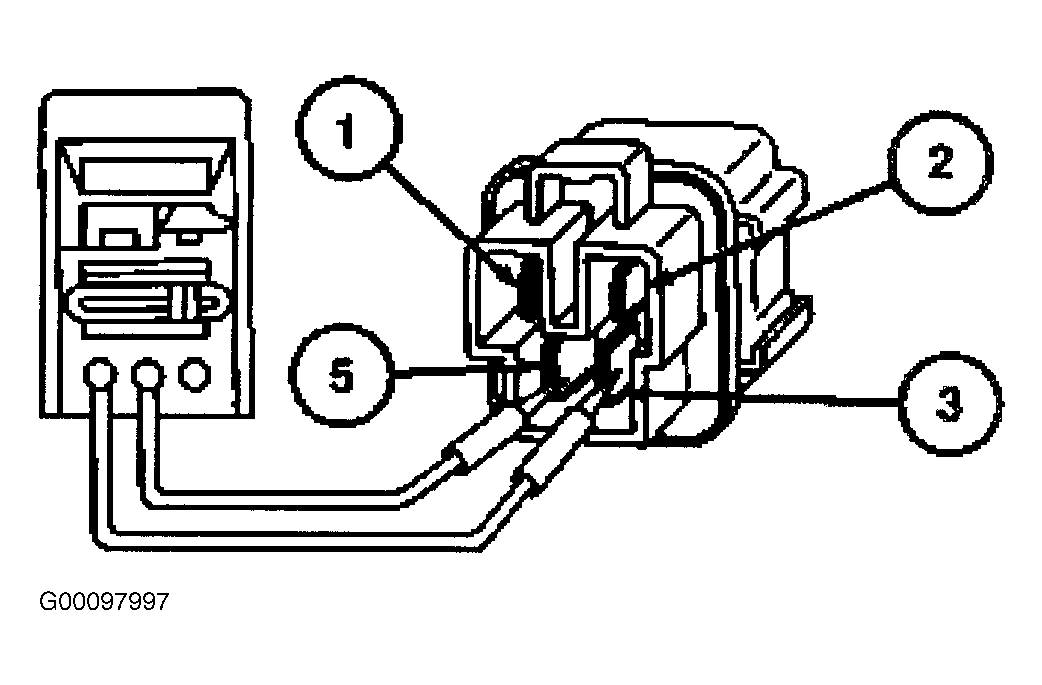
- Check ASCD hold relay. Turn key OFF. Remove the ASCD hold relay. Using a jumper, connect terminal No. 2 on the ASCD hold relay to the battery positive terminal. See Fig 3
. Measure the resistance between the terminals No. 5 and 3 on the ASCD hold relay during the following conditions, see ASCD HOLD RELAY RESISTANCE
table. See WIRING DIAGRAMS
. Is the resistance OK? If yes, go to next step. If no, replace ASCD hold relay.
ASCD HOLD RELAY RESISTANCE
| Terminal No. 1 |
Resistance |
| Connected To Negative Battery Terminal |
Less Than 5 Ohms |
| Not Connected |
Greater Than 10,000 Ohms |
- Check wire between ASCD hold relay and speed control module. Turn key OFF. Disconnect the ASCD hold relay and the speed control module connector. Measure the resistance of the Green/White wire between the ASCD hold relay connector and the speed control module connector. See WIRING DIAGRAMS
. Is the resistance less than 5 ohms? If yes, go to next step. If no, service Green/White wire.
- Check speed control module ground. Turn key OFF. Install the ASCD hold relay. Disconnect the speed control module connector. Measure the resistance of the Black wire between the speed control module connector and ground. See WIRING DIAGRAMS
. Is the resistance less than 5 ohms? If yes, go to next step. If no, service Black wire.
- Check vehicle speed signal. Turn key OFF. Disconnect the black conventional instrument cluster connector (12 pin) or the electronic instrument cluster connector (16 pin), and the speed control module connector. See WIRING DIAGRAMS
for connector identification. Measure the resistance of the Green/Yellow wire between the instrument cluster connector and the speed control module connector. Measure the resistance of the Green/Yellow wire between the instrument cluster connector and ground. Is the resistance less than 5 ohms between the instrument cluster and the speed control module, and less than 10,000 ohms between the instrument cluster and ground? If yes, go to next step. If no, service Green/Yellow wire.
- Check brake on/off switch operation. Exercise the brake pedal and check for proper stoplamp operation. Do the stoplamps operate properly? If yes, go to next step. If no, diagnose and repair problem in brake light circuit.
- Check brake on/off switch signal. Turn key OFF. Reconnect the black conventional instrument cluster connector (12 pin) or the electronic instrument cluster connector (16 pin). Disconnect the speed control module connector. Depress the brake pedal. Measure the voltage of the Green/Black wire at the speed control module connector. Release the brake pedal. Measure the voltage of the Green/Black wire at the speed control module connector. See WIRING DIAGRAMS
. Is the voltage greater than 10 volts with the brake pedal depressed, and less than 1 volt with the brake pedal released? If yes, go to next step. If no, repair Green/Black and Yellow/Black wires.
- Check speed control disengage circuit. Turn key OFF. Disconnect the speed control module connector. Turn key ON. Measure the voltage on the Yellow wire at the speed control module connector under specified conditions. See SPEED CONTROL DISENGAGE CIRCUIT VOLTAGE
table. See WIRING DIAGRAMS
. Are the voltages correct? If yes, go to step 24
. If no, go to next step.
SPEED CONTROL DISENGAGE CIRCUIT VOLTAGE
| Speed Control Actuator Switch |
Selector Lever Position |
Brake Pedal Position |
Voltage |
| ON |
P Or N |
Released |
Less Than 1 Volt |
| ON |
P Or N |
Depressed |
Less Than 1 Volt |
| ON |
R, D, 2, Or 1 |
Released |
Greater Than 10 Volts |
| ON |
R, D, 2, Or 1 |
Depressed |
Less Than 1 Volt |
- Check wire between speed control module and speed control disengage switch. Turn key OFF. Disconnect the speed control module connector and the speed control disengage switch connector located on top of the brake pedal assembly. Measure the resistance of the Yellow wire between the speed control module connector and the speed control disengage switch connector. Measure the resistance of the Yellow wire between the speed control module connector and ground. See WIRING DIAGRAMS
. Is the resistance less than 5 ohms between the speed control module and the speed control disengage switch, and greater than 10,000 ohms between the speed control module and ground? If yes, go to next step. If no, service Yellow wire.
- Check speed control disengage switch. Turn key OFF. Reconnect the speed control module connector. Disconnect the speed control disengage switch connector. Measure the resistance between the following wire terminals on the speed control disengage switch under the following conditions, see SPEED CONTROL DISENGAGE CIRCUIT RESISTANCE
table. See WIRING DIAGRAMS
. If yes, go to next step. If no, replace the speed control disengage switch.
SPEED CONTROL DISENGAGE CIRCUIT RESISTANCE
| Brake Pedal Position |
Wire Terminals |
Resistance (Ohms) |
| Depressed |
Yellow & Blue/White Wires |
Greater Than 10,000 |
| Released |
Yellow & Blue/White Wires |
Less Than 5 |
- Check wire between inhibit relay and speed control disengage switch. Turn key OFF. Disconnect the speed control disengage switch connector and remove the inhibit relay from the left hand engine compartment relay panel. Measure the resistance of the Blue/White wire between the inhibit relay connector and the speed control disengage switch connector. Measure the resistance of the Blue/White wire between the inhibit relay connector and ground. See Fig 4
. See WIRING DIAGRAMS
. Is the resistance less than 5 ohms between the inhibit relay and the speed control disengage switch, and greater than 10,000 ohms between the inhibit relay and ground? If yes, go to next step. If no, service Blue/White wire.
 Courtesy of FORD MOTOR CO.
 Courtesy of FORD MOTOR CO.
- Check wire between inhibit relay and speed control module. Turn key OFF. Reconnect the speed control disengage switch connector. Remove the inhibit relay and disconnect the speed control module connector. Measure the resistance of the Green/White wire between the inhibit relay connector and the speed control module connector. See WIRING DIAGRAMS
. Is the resistance less than 5 ohms? If yes, go to next step. If no, service Green/White wire.
- Check inhibit relay ground. Turn key OFF. Disconnect the inhibit relay connector. Measure the resistance of the Black wire between the inhibit relay connector and ground. See WIRING DIAGRAMS
. Is the resistance less than 5 ohms? If yes, go to next step. If no, service Black wire.
- Check transmission range switch input to inhibit relay. Turn key OFF. Disconnect the inhibit relay connector. Turn key ON. Measure the voltage on the Light Green/Black wire at the inhibit relay with the selector lever in PARK (P) and NEUTRAL (N). Measure the voltage on the Light Green/Black wire at the inhibit relay connector with the selector lever in all other positions. See WIRING DIAGRAMS
. Is the voltage greater than 10 volts with the selector lever in PARK (P) and NEUTRAL (N), and less than 1 volt with the selector lever in all other positions? If yes, replace inhibit relay. If no, go to next step.
- Check wire between transmission range switch and inhibit relay. Turn key OFF. Disconnect the Transmission Range (TR) switch connector. Disconnect the inhibit relay connector. Measure the resistance of the Light Green/Black wire between the TR switch connector and the inhibit relay connector. Measure the resistance of the Light Green/Black wire between the inhibit relay connector and ground. See WIRING DIAGRAMS
. Is the resistance less than 5 ohms between the TR switch connector and the inhibit switch connector, and greater than 10,000 ohms between the TR switch connector and ground? If yes, go to next step. If no, repair Light Green/Black wire.
- Check voltage to transmission range switch. Turn key OFF. Disconnect the Transmission Range (TR) switch connector. Turn key ON. Measure the voltage on the Light Green wire at the TR switch connector. See WIRING DIAGRAMS
. Is the voltage greater than 10 volts? If yes, replace transmission range switch. If no, service Light Green wire.
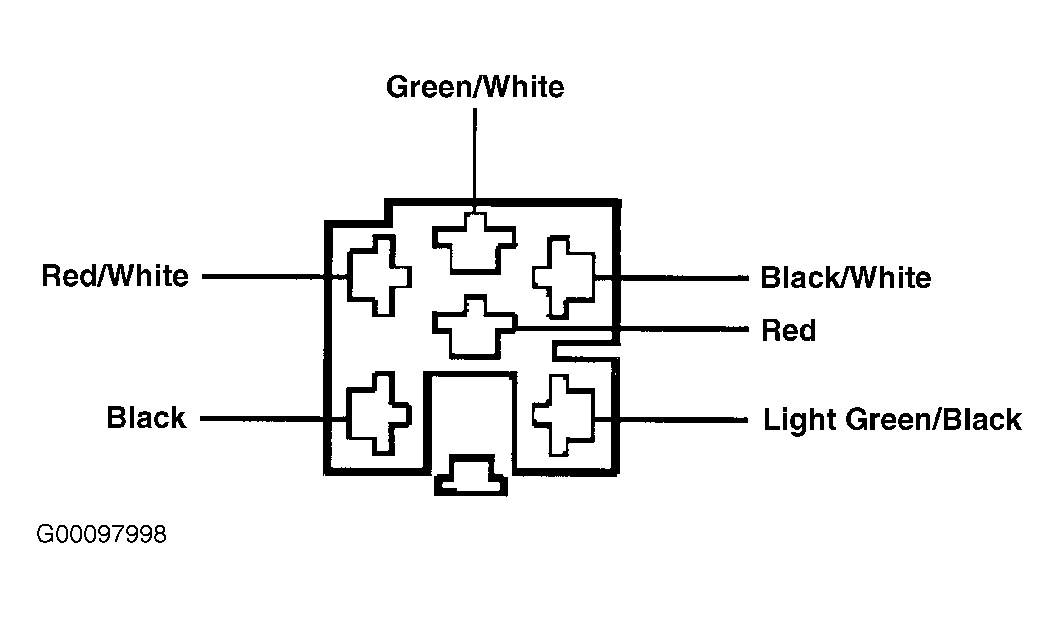
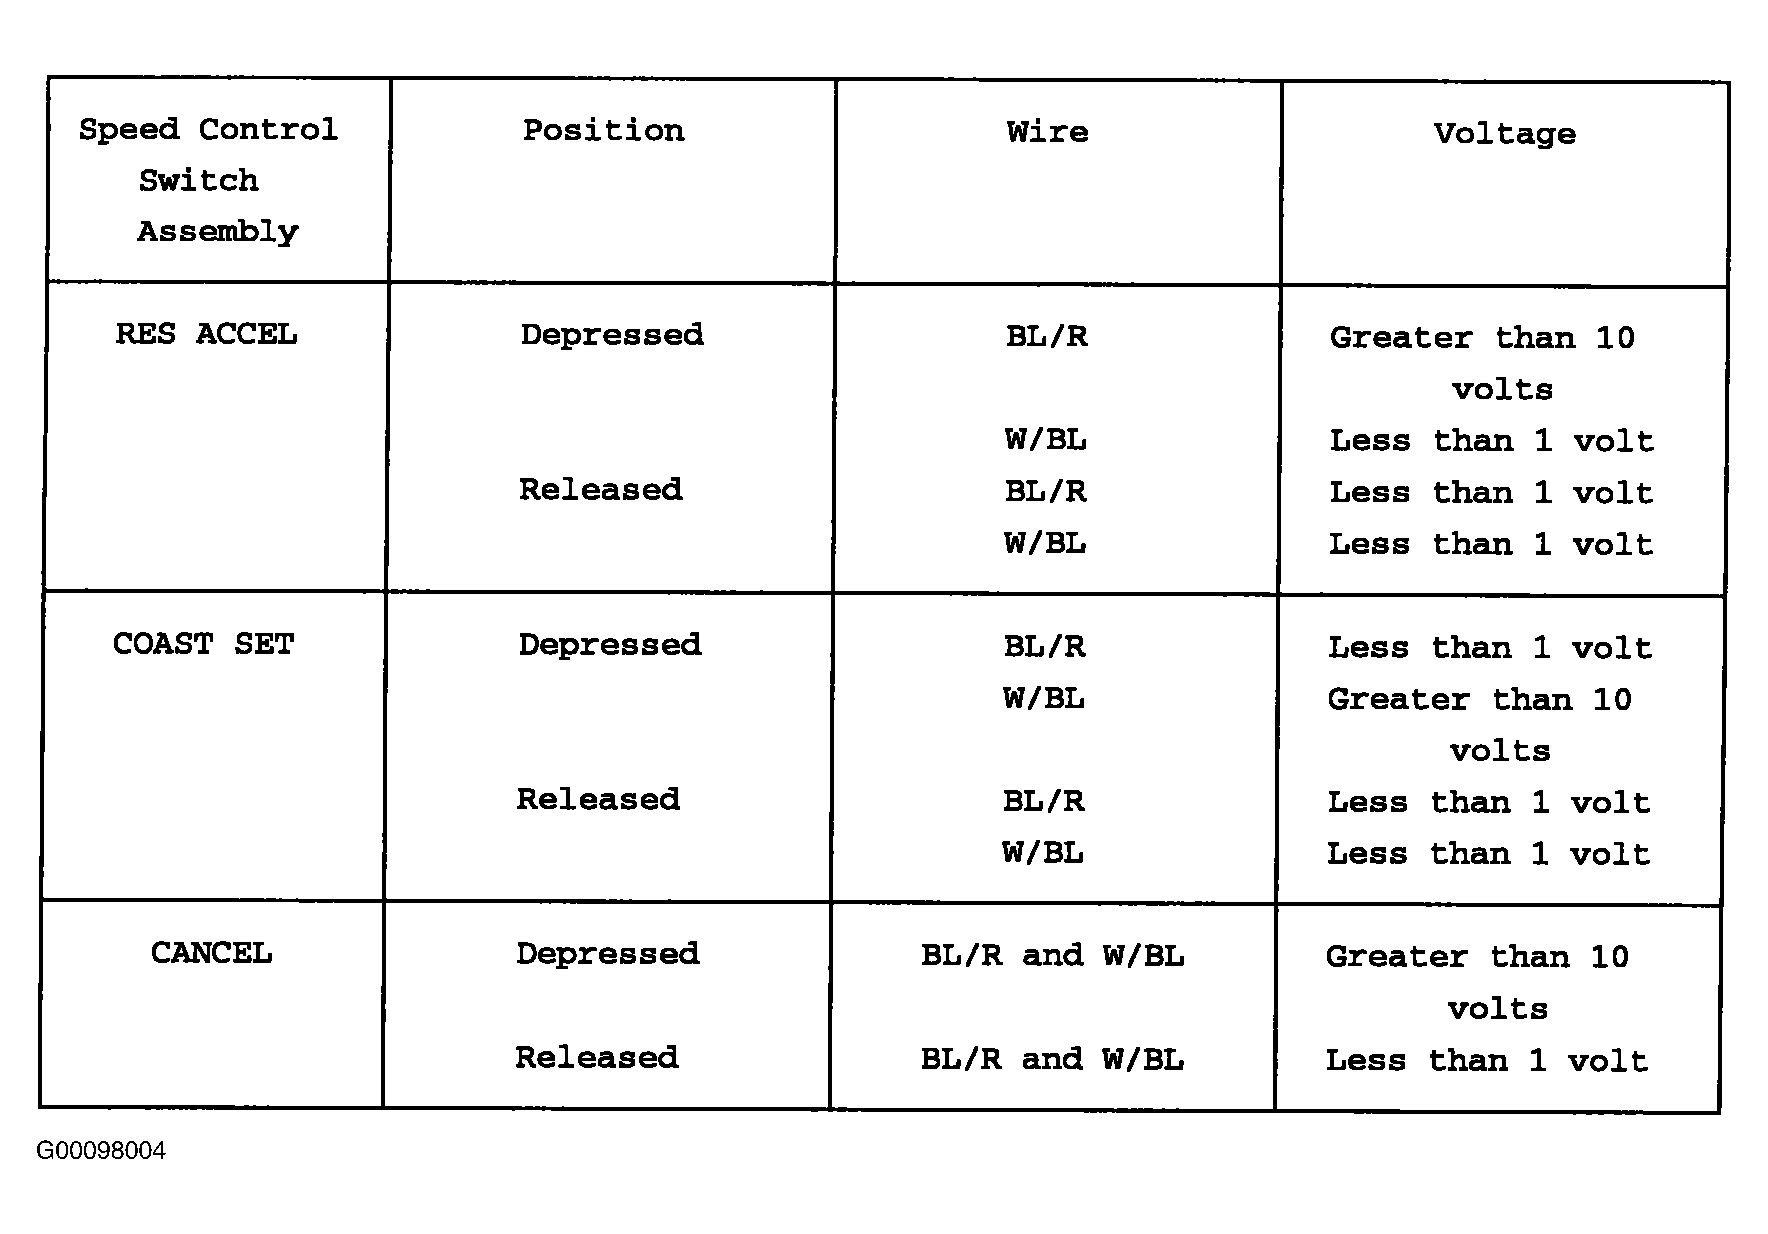
- Check speed control switch assembly circuit. Turn key OFF. Install the inhibit relay. Verify operation of the horn. If horn is inoperative, diagnose and repair horn circuit. Disconnect the speed control module connector. Measure the voltage on the following wires at the speed control module connector under the specified conditions. See Fig 5
. See WIRING DIAGRAMS
. Are the voltages OK? If yes, go to step 27
. If no, go to next step.
 Courtesy of FORD MOTOR CO.
- Check wires between speed control module and clockspring. Turn key OFF. Disconnect the speed control module connector and the clockspring connector.
- Measure the resistance of the Blue/Red wire between the speed control module connector and the clockspring connector.
- Measure the resistance of the White/Blue wire between the speed control module connector and the clockspring connector.
- Measure the resistance of the Blue/Red wire between the speed control module connector and ground.
- Measure the resistance of the White/Blue wire between the speed control module connector and ground.
See WIRING DIAGRAMS
. Is the resistance less than 5 ohms between the speed control module and the clockspring, and greater than 10,000 ohms between the speed control module and ground? If yes, go to next step. If no, service wire(s) in question.
- Check speed control switch assembly. See SPEED CONTROL SWITCH
under COMPONENT TESTING. Is the speed control switch assembly OK? If yes, replace clockspring. See CLOCKSPRING R & I
in AIR BAG article. If no, replace speed control switch assembly. See SPEED CONTROL SWITCH ASSEMBLY
under REMOVAL & INSTALLATION.
- Check wires between speed control module and speed control actuator. Turn key OFF. Disconnect the speed control module connector and the speed control actuator connector. Measure the resistance of the following wires between the speed control module connector and the speed control actuator connector, Brown wire, Light Blue wire, Brown/Yellow wire, and the Orange wire. Measure the resistance of the same wires between the speed control module connector and ground. See WIRING DIAGRAMS
. Are the resistances less than 5 ohms between the speed control module and the speed control actuator, and greater than 10,000 ohms between the speed control module and ground? If yes, go to next step. If no, service wire(s) in question.
- Check speed control actuator. See SPEED CONTROL ACTUATOR
under COMPONENT TESTING. Is the speed control actuator OK? If yes, replace speed control module. See SPEED CONTROL MODULE
under REMOVAL & INSTALLATION. If no, replace speed control actuator. See SPEED CONTROL ACTUATOR
under REMOVAL & INSTALLATION.