Diagnosis & Repair
- Check for cracks and deformations in fuel tank, charcoal canister and fuel tank filler pipe. Check for disconnected hoses and tubes around fuel tank and charcoal canister. If problem does not exist, go to next step. If problem exists, repair as necessary.
- Check fuel tank cap to ensure fuel tank cap is a Original Equipment Manufacturer (OEM) fuel tank cap. If fuel tank cap is an OEM fuel tank cap, go to next step. If fuel tank cap is not an OEM fuel tank cap, replace fuel tank cap with an OEM fuel tank cap.
- Ensure fuel tank cap is properly installed and tightened. If fuel tank cap is properly installed and tightened, go to next step. If fuel tank cap is not properly installed or tightened, reinstall and tighten as necessary.
- Check fuel tank cap for damage and damaged gasket. If fuel tank cap is not damaged and gasket is okay, go to next step. If fuel tank cap or gasket is damaged, replace fuel tank cap with an OEM fuel tank cap.
- Remove fuel tank cap. Visually inspect fuel tank filler pipe for damage. If problem exists, replace fuel tank filler pipe as necessary. If problem does not exist, go to next step.
- Check all EVAP system electrical component connections. If problem does not exist, go to next step. If problem exists, repair as necessary.
- Check vacuum hoses between canister closed valve VSV and charcoal canister, between charcoal canister and fuel tank overfill check valve, between overfill check valve and fuel tank filler pipe, and between fuel tank filler pipe and fuel tank. If problem does not exist, go to next step. If problem exists, repair vacuum hoses as necessary.
- Access ECM behind glove box. See Figure. Turn ignition on. Using DVOM, backprobe ECM harness connector and measure voltage between terminals No. 1 (Red/White wire) and No. 9 (Brown wire) at ECM harness connector E6. See Figure. Voltage should be 4.5-5.5 volts. If voltage is as specified, go to next step. If voltage is not as specified, replace ECM.
- Using DVOM, backprobe ECM harness connector and measure voltage between terminals No. 9 (Brown wire) and No. 14 (Black wire) at ECM harness connector E6. Remove fuel tank cap. Turn ignition on. Voltage should be 3.0-3.6 volts. If voltage is not as specified, go to next step. If voltage is as specified, go to step 11.
- Check for an open or short in wiring between vapor pressure sensor and ECM. See WIRING DIAGRAMS article. If problem exists, repair wiring as necessary. If problem does not exist, replace vapor pressure sensor.
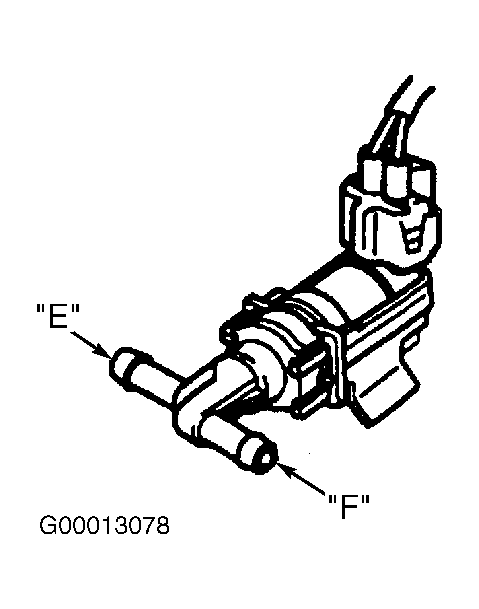
- Disconnect EVAP VSV vacuum hoses. Turn ignition on. Access ECM behind glove box. See Figure. Connect a jumper wire by backprobing between ground and terminal No. 9 (White/Green wire) at ECM harness connector E7. See Figure. With jumper wire connected air applied to EVAP VSV port "E" should flow from port "F". See Fig 1. Remove jumper wire. With jumper wire removed, air applied to EVAP VSV port "E" should not flow from port "F". If EVAP VSV does not function as specified, go to next step. If EVAP VSV functions as specified, go to step 14.
- Turn ignition off. Connect all disconnected components. Check EVAP VSV operation. See FUEL EVAPORATIVE SYSTEM under EMISSION SYSTEMS & SUB-SYSTEMS in SYSTEM & COMPONENT TESTING - 4-CYLINDER article. If EVAP VSV is okay, go to next step. If EVAP VSV is not okay, replace EVAP VSV. Also, clean vacuum hose between throttle body and EVAP VSV, and between EVAP VSV and charcoal canister, then check charcoal canister. See FUEL EVAPORATIVE SYSTEM under EMISSION SYSTEMS & SUB-SYSTEMS in SYSTEM & COMPONENT TESTING - 4-CYLINDER article.
- Check for an open or short in wiring between EFI relay and EVAP VSV, and between EVAP VSV and ECM. See WIRING DIAGRAMS article. If problem exists, repair wiring as necessary. If problem does not exist, replace ECM.
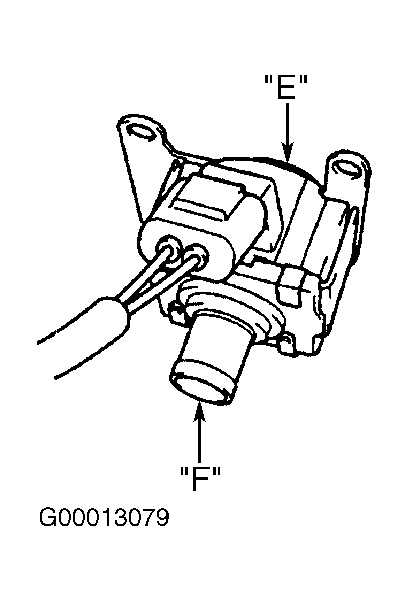
- Disconnect canister closed valve VSV vacuum hoses. Turn ignition on. Access ECM behind glove box. See Figure. Connect a jumper wire by backprobing between ground and terminal No. 3 (Blue wire) at ECM harness connector E4. With jumper wire connected air applied to canister closed valve VSV port "E" should not flow from port "F". See Fig 2. Remove jumper wire. With jumper wire removed, air applied to canister closed valve VSV port "E" should flow from port "F". If canister closed valve VSV does not function as specified, go to next step. If canister closed valve VSV functions as specified, go to step 17.
- Turn ignition off. Connect all disconnected components. Check canister closed valve VSV. See FUEL EVAPORATIVE SYSTEM under EMISSION SYSTEMS & SUB-SYSTEMS in SYSTEM & COMPONENT TESTING - 4-CYLINDER article. If canister closed valve VSV is okay, go to next step. If canister closed valve VSV is defective, replace canister closed valve VSV and charcoal canister. Also, clean vacuum hose between charcoal canister and canister closed valve VSV.
- Check for an open or short in wiring between EFI relay and canister closed valve VSV, and between canister closed valve VSV and ECM. See WIRING DIAGRAMS article. If problem exists, repair wiring as necessary. If problem does not exist, replace ECM.
- Charcoal canister or fuel tank overfill check valve maybe defective. Check fuel evaporative system. See FUEL EVAPORATIVE SYSTEM under EMISSION SYSTEMS & SUB-SYSTEMS in SYSTEM & COMPONENT TESTING - 4-CYLINDER article. Repair as necessary.
 Courtesy of © TOYOTA, LICENSE AGREEMENT TMS1002
 Courtesy of © TOYOTA, LICENSE AGREEMENT TMS1002